Oracle AI Database Private Agent Factory does not have to depend on a public LLM endpoint for a first private-network demo. In this walkthrough, Agent Factory is deployed from OCI Marketplace into a private subnet, Ollama runs locally on the same Agent Factory VM, and Database Tools MCP Server provides the managed SQL tool surface for a private Autonomous Database.
This is a demo walkthrough, not a production reference architecture. Do not use it as-is for production. Before turning this into a shared service, design the missing pieces deliberately: availability, patching, secret rotation, identity governance, monitoring, audit logging, egress controls, backup and recovery, and operational ownership.
The walkthrough keeps the runtime path narrow:
- Keep Agent Factory private.
- Keep the database private.
- Keep the LLM local to the private Agent Factory VM.
- Use the OCI-managed Database Tools MCP Server instead of running a custom MCP server.
- Use Private Service Access for the Database Tools service path.
- Validate the agent from inside the private compute instance.
This is a long, command-heavy walkthrough. At a high level, the work breaks down into five phases:
- Import the private network, Autonomous Database, Database Tools connection, and MCP values from the foundation post.
- Add temporary bootstrap and NAT access, then deploy Agent Factory from OCI Marketplace into the existing private subnet.
- Install Ollama on the Agent Factory VM and configure Agent Factory to use it as the local model provider.
- Create the Agent Factory repository users and demo table through Database Tools.
- Connect Agent Factory to an existing managed Database Tools MCP Server, build a small graph, validate it from inside the private VM, then remove temporary bootstrap and NAT access.
If you already have a private Autonomous Database, Database Tools connection, and Database Tools MCP Server, you can focus on the Agent Factory, Ollama, MCP authorization, and validation steps.
This post assumes you completed Create a Private Managed Database Tools MCP Server in OCI first. That post creates the VCN, private subnet, private Autonomous Database, Database Tools connection, managed MCP Server, SQL toolset, OAuth role assignment, and IAM policy. This post builds the Agent Factory runtime on top of those resources.
Architecture

The bootstrap VM is only for administration. Use it to SSH into the private Agent Factory VM, open the browser tunnel for the setup wizard, and run validation commands. After the demo, stop it for later maintenance or replace it with OCI Bastion, VPN, or FastConnect.
The network split is:
- Agent Factory has no public IP.
- The Autonomous Database uses a private endpoint.
- Database Tools reaches the private database through a Database Tools private endpoint.
- Agent Factory reaches the Database Tools MCP Server through Private Service Access.
- NAT is used only for setup tasks such as package installation and model download, then removed from the private route table.
Step 1: Confirm the architecture and variables
Define the deployment prefix, region, compartment, tenancy, SSH key, CIDR ranges, and the identity domain/client strategy.
Start with a shell that keeps the OCI CLI settings explicit. This walkthrough uses session-token authentication, so OCI_CLI_AUTH=security_token is exported once and the remaining OCI CLI commands rely on these environment variables instead of repeating --profile, --region, and --auth on every command.
The commands in this post were tested with OCI CLI 3.84.0. Use a recent OCI CLI build because older versions may not include the Database Tools MCP commands.
oci --versionexport OCI_CLI_PROFILE="<oci-cli-profile>"
export OCI_CLI_REGION="us-phoenix-1"
export OCI_CLI_AUTH="security_token"
export OCI_REGION="$OCI_CLI_REGION"
export TENANCY_OCID="<tenancy-ocid>"
export COMPARTMENT_OCID="<compartment-ocid>"
export DEPLOYMENT_PREFIX="dbtools-mcp-demo"
export VCN_CIDR="10.90.0.0/16"
export BOOTSTRAP_SUBNET_CIDR="10.90.0.0/24"
export AGENT_SUBNET_CIDR="10.90.20.0/24"
export VCN_OCID="<vcn-ocid-from-foundation-post>"
export PRIVATE_SUBNET_OCID="<private-subnet-ocid-from-foundation-post>"
export PRIVATE_ROUTE_TABLE_OCID="<private-route-table-ocid-from-foundation-post>"
export PRIVATE_SECURITY_LIST_OCID="<private-security-list-ocid-from-foundation-post>"
export ADB_OCID="<autonomous-database-ocid-from-foundation-post>"
export DBTOOLS_CONNECTION_OCID="<database-tools-connection-ocid-from-foundation-post>"
export AGENT_SUBNET_OCID="$PRIVATE_SUBNET_OCID"
export AGENT_SECURITY_LIST_OCID="$PRIVATE_SECURITY_LIST_OCID"
export SSH_PUBLIC_KEY_FILE="$HOME/.ssh/id_rsa.pub"
export SSH_SOURCE_CIDR="<your-ssh-source-ip>/32"Use the same DEPLOYMENT_PREFIX value from the foundation post unless you intentionally want the Agent Factory resources to use a different naming prefix.
The foundation post prints the existing private subnet as PRIVATE_SUBNET_OCID and the existing private security list as PRIVATE_SECURITY_LIST_OCID. This post aliases those values to AGENT_SUBNET_OCID and AGENT_SECURITY_LIST_OCID because the same private subnet hosts the Agent Factory VM.
If you open a new terminal during the walkthrough, re-export these variables before continuing.
If you are on VPN, do not assume that curl ifconfig.me is the same source IP OCI sees for SSH. Use the source address that actually reaches OCI, or temporarily test with a broader rule and tighten it immediately after SSH works.
Before continuing, make sure this OCI CLI profile can create networking, compute, Marketplace, Resource Manager, Database Tools runtime, and Private Service Access resources in the target compartment.
Discover a current Oracle Linux image for the temporary bootstrap VM instead of hard-coding old image OCIDs. The exact image OCID changes by region and date.
oci compute image list \
  --compartment-id "$COMPARTMENT_OCID" \
  --operating-system "Oracle Linux" \
  --shape "VM.Standard.E5.Flex" \
  --sort-by TIMECREATED \
  --sort-order DESC \
  --all \
  --query 'data[?contains("display-name", `Oracle-Linux-9`)] | [0].{name:"display-name",id:id,time:"time-created"}' \
  --output json
Set the bootstrap VM image from that output:
export BOOTSTRAP_IMAGE_OCID="<oracle-linux-9-image-ocid>"For the bootstrap VM, use a shape that exists in your selected availability domain. VM.Standard.E2.1.Micro is not always available. VM.Standard.E5.Flex with one OCPU is a practical fallback.
export BOOTSTRAP_SHAPE="VM.Standard.E5.Flex"
export BOOTSTRAP_OCPUS="1"
export BOOTSTRAP_MEMORY_GBS="12"
This walkthrough assumes the identity domain, MCP Server, and Database Tools connection were created in the foundation post. The foundation validation can use a public OAuth client for Codex and mcp-remote; Agent Factory uses a separate confidential OAuth client with a client secret.
Step 2: Add temporary setup access
The foundation post created the private network and database. This step adds only the temporary access needed for Agent Factory setup:
- A public bootstrap subnet and VM for SSH and browser tunneling.
- An Internet Gateway for the bootstrap subnet.
- A temporary NAT Gateway route for the private Agent Factory subnet while installing packages and pulling the Ollama model.
Create the Internet Gateway and temporary NAT Gateway:
export IGW_OCID="$(
  oci network internet-gateway create \
    --compartment-id "$COMPARTMENT_OCID" \
    --vcn-id "$VCN_OCID" \
    --display-name "${DEPLOYMENT_PREFIX}-igw" \
    --is-enabled true \
    --wait-for-state AVAILABLE \
    --query 'data.id' \
    --raw-output
)"

export NAT_GATEWAY_OCID="$(
  oci network nat-gateway create \
    --compartment-id "$COMPARTMENT_OCID" \
    --vcn-id "$VCN_OCID" \
    --display-name "${DEPLOYMENT_PREFIX}-temporary-nat" \
    --block-traffic false \
    --wait-for-state AVAILABLE \
    --query 'data.id' \
    --raw-output
)"

echo "IGW_OCID=${IGW_OCID}"
echo "NAT_GATEWAY_OCID=${NAT_GATEWAY_OCID}"
Create a route table for the public bootstrap subnet:
export PUBLIC_ROUTE_TABLE_OCID="$(
  oci network route-table create \
    --compartment-id "$COMPARTMENT_OCID" \
    --vcn-id "$VCN_OCID" \
    --display-name "${DEPLOYMENT_PREFIX}-public-rt" \
    --route-rules "[{\"cidrBlock\":\"0.0.0.0/0\",\"networkEntityId\":\"${IGW_OCID}\"}]" \
    --wait-for-state AVAILABLE \
    --query 'data.id' \
    --raw-output
)"

echo "PUBLIC_ROUTE_TABLE_OCID=${PUBLIC_ROUTE_TABLE_OCID}"
Temporarily add the NAT route to the existing private route table from the foundation post:
oci network route-table update \
  --rt-id "$PRIVATE_ROUTE_TABLE_OCID" \
  --route-rules "[{\"cidrBlock\":\"0.0.0.0/0\",\"networkEntityId\":\"${NAT_GATEWAY_OCID}\"}]" \
  --force \
  --wait-for-state AVAILABLE
Create a security list for the bootstrap subnet. SSH is scoped to SSH_SOURCE_CIDR; use a /32 when possible.
export BOOTSTRAP_SECURITY_LIST_OCID="$(
  oci network security-list create \
    --compartment-id "$COMPARTMENT_OCID" \
    --vcn-id "$VCN_OCID" \
    --display-name "${DEPLOYMENT_PREFIX}-bootstrap-sl" \
    --egress-security-rules '[{"destination":"0.0.0.0/0","protocol":"all"}]' \
    --ingress-security-rules "[{\"source\":\"${SSH_SOURCE_CIDR}\",\"protocol\":\"6\",\"tcpOptions\":{\"destinationPortRange\":{\"min\":22,\"max\":22}}}]" \
    --wait-for-state AVAILABLE \
    --query 'data.id' \
    --raw-output
)"

echo "BOOTSTRAP_SECURITY_LIST_OCID=${BOOTSTRAP_SECURITY_LIST_OCID}"
Temporarily update the existing private security list so the bootstrap subnet can reach SSH and Agent Factory’s HTTPS port. Keep the ADB and PSA rules from the foundation post.
if [ -z "${AGENT_SECURITY_LIST_OCID:-}" ]; then
  echo "AGENT_SECURITY_LIST_OCID is empty. Set it to the PRIVATE_SECURITY_LIST_OCID value from the foundation post." >&2
  return 1 2>/dev/null || exit 1
fi

oci network security-list update \
  --security-list-id "$AGENT_SECURITY_LIST_OCID" \
  --egress-security-rules '[{"destination":"0.0.0.0/0","protocol":"all"}]' \
  --ingress-security-rules "[{\"source\":\"${BOOTSTRAP_SUBNET_CIDR}\",\"protocol\":\"6\",\"tcpOptions\":{\"destinationPortRange\":{\"min\":22,\"max\":22}}},{\"source\":\"${BOOTSTRAP_SUBNET_CIDR}\",\"protocol\":\"6\",\"tcpOptions\":{\"destinationPortRange\":{\"min\":8080,\"max\":8080}}},{\"source\":\"${AGENT_SUBNET_CIDR}\",\"protocol\":\"6\",\"tcpOptions\":{\"destinationPortRange\":{\"min\":1522,\"max\":1522}}},{\"source\":\"${AGENT_SUBNET_CIDR}\",\"protocol\":\"6\",\"tcpOptions\":{\"destinationPortRange\":{\"min\":443,\"max\":443}}}]" \
  --force \
  --wait-for-state AVAILABLE
Create the public bootstrap subnet:
export BOOTSTRAP_SUBNET_OCID="$(
  oci network subnet create \
    --compartment-id "$COMPARTMENT_OCID" \
    --vcn-id "$VCN_OCID" \
    --display-name "${DEPLOYMENT_PREFIX}-bootstrap-subnet" \
    --cidr-block "$BOOTSTRAP_SUBNET_CIDR" \
    --dns-label boot \
    --route-table-id "$PUBLIC_ROUTE_TABLE_OCID" \
    --security-list-ids "[\"${BOOTSTRAP_SECURITY_LIST_OCID}\"]" \
    --prohibit-public-ip-on-vnic false \
    --wait-for-state AVAILABLE \
    --query 'data.id' \
    --raw-output
)"

echo "BOOTSTRAP_SUBNET_OCID=${BOOTSTRAP_SUBNET_OCID}"
Step 3: Create the temporary bootstrap host
This step creates only the temporary bootstrap VM in the public subnet. Do not create a custom private Agent Factory VM. Agent Factory comes from OCI Marketplace in the next step.
The bootstrap host is a controlled administration path. Your workstation reaches the bootstrap VM by SSH, and later the bootstrap VM is used as a jump host to reach the private Marketplace Agent Factory VM.
Make sure the Step 2 subnet variables are still exported before continuing:
echo "BOOTSTRAP_SUBNET_OCID=${BOOTSTRAP_SUBNET_OCID}"
echo "AGENT_SUBNET_OCID=${AGENT_SUBNET_OCID}"
echo "SSH_PUBLIC_KEY_FILE=${SSH_PUBLIC_KEY_FILE}"

if [ -z "${BOOTSTRAP_SUBNET_OCID:-}" ] || [ -z "${AGENT_SUBNET_OCID:-}" ]; then
  echo "BOOTSTRAP_SUBNET_OCID and AGENT_SUBNET_OCID must both be set before creating compute resources." >&2
  return 1 2>/dev/null || exit 1
fi
Select an availability domain and confirm the bootstrap compute settings:
export AD_NAME="$(
  oci iam availability-domain list \
    --compartment-id "$TENANCY_OCID" \
    --query 'data[0].name' \
    --raw-output
)"

export BOOTSTRAP_SHAPE="${BOOTSTRAP_SHAPE:-VM.Standard.E5.Flex}"
export BOOTSTRAP_OCPUS="${BOOTSTRAP_OCPUS:-1}"
export BOOTSTRAP_MEMORY_GBS="${BOOTSTRAP_MEMORY_GBS:-12}"

echo "AD_NAME=${AD_NAME}"
echo "BOOTSTRAP_SHAPE=${BOOTSTRAP_SHAPE}"
echo "BOOTSTRAP_OCPUS=${BOOTSTRAP_OCPUS}"
echo "BOOTSTRAP_MEMORY_GBS=${BOOTSTRAP_MEMORY_GBS}"
Confirm the bootstrap image OCID from Step 1 is still set:
echo "BOOTSTRAP_IMAGE_OCID=${BOOTSTRAP_IMAGE_OCID}"Create the temporary bootstrap VM in the public subnet. If Compute returns NotAuthorizedOrNotFound, confirm the selected shape is available in the chosen availability domain and that the image/subnet OCIDs are from the same region.
export BOOTSTRAP_INSTANCE_OCID="$(
  oci compute instance launch \
    --compartment-id "$COMPARTMENT_OCID" \
    --availability-domain "$AD_NAME" \
    --display-name "${DEPLOYMENT_PREFIX}-bootstrap" \
    --shape "$BOOTSTRAP_SHAPE" \
    --shape-config "{\"ocpus\":${BOOTSTRAP_OCPUS},\"memoryInGBs\":${BOOTSTRAP_MEMORY_GBS}}" \
    --image-id "$BOOTSTRAP_IMAGE_OCID" \
    --subnet-id "$BOOTSTRAP_SUBNET_OCID" \
    --assign-public-ip true \
    --ssh-authorized-keys-file "$SSH_PUBLIC_KEY_FILE" \
    --wait-for-state RUNNING \
    --query 'data.id' \
    --raw-output
)"

echo "BOOTSTRAP_INSTANCE_OCID=${BOOTSTRAP_INSTANCE_OCID}"
Capture the bootstrap public and private IP addresses:
export BOOTSTRAP_PUBLIC_IP="$(
  oci compute instance list-vnics \
    --compartment-id "$COMPARTMENT_OCID" \
    --instance-id "$BOOTSTRAP_INSTANCE_OCID" \
    --query 'data[0]."public-ip"' \
    --raw-output
)"

export BOOTSTRAP_PRIVATE_IP="$(
  oci compute instance list-vnics \
    --compartment-id "$COMPARTMENT_OCID" \
    --instance-id "$BOOTSTRAP_INSTANCE_OCID" \
    --query 'data[0]."private-ip"' \
    --raw-output
)"

printf '%s\n' \
  "BOOTSTRAP_PUBLIC_IP=${BOOTSTRAP_PUBLIC_IP}" \
  "BOOTSTRAP_PRIVATE_IP=${BOOTSTRAP_PRIVATE_IP}"
Validate SSH to the bootstrap VM:
ssh opc@"$BOOTSTRAP_PUBLIC_IP" "hostname && uname -a"If SSH to the bootstrap VM fails, check the bootstrap security list first. The most common cause is that SSH_SOURCE_CIDR does not match the source IP OCI sees, especially when a VPN or corporate proxy is involved.
Step 4: Launch Agent Factory from OCI Marketplace
Launch Oracle AI Database Private Agent Factory from OCI Marketplace into the private Agent Factory subnet.
Marketplace creates a Resource Manager stack and the Agent Factory VM. The image, container layout, and installation assets come from Oracle’s Marketplace package instead of a hand-built Linux installation.
This listing is an orchestration package, not a normal Compute image launch. Start with Marketplace discovery:
oci marketplace listing list \
  --compartment-id "$COMPARTMENT_OCID" \
  --name "Oracle AI Database Private Agent Factory" \
  --package-type ORCHESTRATION \
  --all \
  --query 'data[].{name:name,id:id,packageType:"package-type"}' \
  --output table
Capture the listing OCID:
export AGENT_FACTORY_MARKETPLACE_LISTING_OCID="$(
  oci marketplace listing list \
    --compartment-id "$COMPARTMENT_OCID" \
    --name "Oracle AI Database Private Agent Factory" \
    --package-type ORCHESTRATION \
    --all \
    --query "data[?name=='Oracle AI Database Private Agent Factory'].id | [0]" \
    --raw-output
)"

echo "AGENT_FACTORY_MARKETPLACE_LISTING_OCID=${AGENT_FACTORY_MARKETPLACE_LISTING_OCID}"
List the package versions and choose one:
oci marketplace package list \
  --compartment-id "$COMPARTMENT_OCID" \
  --listing-id "$AGENT_FACTORY_MARKETPLACE_LISTING_OCID" \
  --all \
  --query 'data[].{version:"package-version",type:"package-type",resourceId:"resource-id"}' \
  --output table
Set the package version from the output:
export AGENT_FACTORY_MARKETPLACE_PACKAGE_VERSION="<package-version>"Get the package ZIP URL:
export AGENT_FACTORY_PACKAGE_ZIP_URL="$(
  oci marketplace package get \
    --compartment-id "$COMPARTMENT_OCID" \
    --listing-id "$AGENT_FACTORY_MARKETPLACE_LISTING_OCID" \
    --package-version "$AGENT_FACTORY_MARKETPLACE_PACKAGE_VERSION" \
    --query 'data."resource-link"' \
    --raw-output
)"

echo "AGENT_FACTORY_PACKAGE_ZIP_URL=${AGENT_FACTORY_PACKAGE_ZIP_URL}"
Retrieve and accept the Marketplace agreement:
export AGENT_FACTORY_AGREEMENT_OCID="$(
  oci marketplace agreement list \
    --compartment-id "$COMPARTMENT_OCID" \
    --listing-id "$AGENT_FACTORY_MARKETPLACE_LISTING_OCID" \
    --package-version "$AGENT_FACTORY_MARKETPLACE_PACKAGE_VERSION" \
    --query 'data[0].id' \
    --raw-output
)"

export AGENT_FACTORY_AGREEMENT_SIGNATURE="$(
  oci marketplace agreement get \
    --compartment-id "$COMPARTMENT_OCID" \
    --listing-id "$AGENT_FACTORY_MARKETPLACE_LISTING_OCID" \
    --package-version "$AGENT_FACTORY_MARKETPLACE_PACKAGE_VERSION" \
    --agreement-id "$AGENT_FACTORY_AGREEMENT_OCID" \
    --query 'data.signature' \
    --raw-output
)"

oci marketplace accepted-agreement create \
  --compartment-id "$COMPARTMENT_OCID" \
  --listing-id "$AGENT_FACTORY_MARKETPLACE_LISTING_OCID" \
  --package-version "$AGENT_FACTORY_MARKETPLACE_PACKAGE_VERSION" \
  --agreement-id "$AGENT_FACTORY_AGREEMENT_OCID" \
  --signature "$AGENT_FACTORY_AGREEMENT_SIGNATURE" \
  --display-name "Oracle AI Database Private Agent Factory agreement"
Download the orchestration package:
curl -L "$AGENT_FACTORY_PACKAGE_ZIP_URL" \
  -o /tmp/oracle-ai-database-private-agent-factory.zip
The package references a Compute Private Image Catalog image internally. Extract the x86 PIC listing and resource version from variables.tf, then subscribe to that image before the Resource Manager apply job. This avoids the launch race where Terraform tries to use an App Catalog image before the subscription has propagated.
export AGENT_FACTORY_PIC_LISTING_OCID="$(
  unzip -p /tmp/oracle-ai-database-private-agent-factory.zip variables.tf |
    awk '
      /variable "mp_listing_id"/ { found=1 }
      found && /^[[:space:]]*default[[:space:]]*=/ {
        line=$0
        sub(/^[^"]*"/, "", line)
        sub(/".*$/, "", line)
        print line
        exit
      }
    '
)"

export AGENT_FACTORY_PIC_RESOURCE_VERSION="$(
  unzip -p /tmp/oracle-ai-database-private-agent-factory.zip variables.tf |
    awk '
      /variable "x86_mp_listing_resource_version"/ { found=1 }
      found && /^[[:space:]]*default[[:space:]]*=/ {
        line=$0
        sub(/^[^"]*"/, "", line)
        sub(/".*$/, "", line)
        print line
        exit
      }
    '
)"

printf '%s\n' \
  "AGENT_FACTORY_PIC_LISTING_OCID=${AGENT_FACTORY_PIC_LISTING_OCID}" \
  "AGENT_FACTORY_PIC_RESOURCE_VERSION=${AGENT_FACTORY_PIC_RESOURCE_VERSION}"
Create the PIC subscription payload and subscribe:
oci compute pic agreements get \
  --listing-id "$AGENT_FACTORY_PIC_LISTING_OCID" \
  --resource-version "$AGENT_FACTORY_PIC_RESOURCE_VERSION" \
  > /tmp/agent-factory-pic-agreement.json

jq --arg compartmentId "$COMPARTMENT_OCID" '
  .data | {
    compartmentId: $compartmentId,
    listingId: ."listing-id",
    resourceVersion: ."listing-resource-version",
    signature: .signature,
    timeRetrieved: ."time-retrieved",
    oracleTouLink: ."oracle-terms-of-use-link",
    eulaLink: ."eula-link"
  }
' /tmp/agent-factory-pic-agreement.json \
  > /tmp/agent-factory-pic-subscription.json

oci compute pic subscription create \
  --from-json file:///tmp/agent-factory-pic-subscription.json
Create the Resource Manager stack variables. These variable names come from the Marketplace orchestration package, so inspect the package if Oracle publishes a newer version.
export SSH_PUBLIC_KEY_BASE64="$(base64 < "$SSH_PUBLIC_KEY_FILE" | tr -d '\n')"

if [ -z "${AGENT_SUBNET_OCID:-}" ]; then
  echo "AGENT_SUBNET_OCID is empty. Set PRIVATE_SUBNET_OCID from the foundation post, then export AGENT_SUBNET_OCID=\"\$PRIVATE_SUBNET_OCID\"." >&2
  return 1 2>/dev/null || exit 1
fi

cat > /tmp/agent-factory-stack-vars.json <<JSON
{
  "agent_factory_server_shape": "VM.Standard.E5.Flex",
  "agent_factory_server_ocups": "8",
  "agent_factory_server_memory_in_gbs": "64",
  "mp_subscription_enabled": false,
  "compartment_ocid": "${COMPARTMENT_OCID}",
  "region": "${OCI_REGION}",
  "subnet_compartment_id": "${COMPARTMENT_OCID}",
  "subnet_id": "${AGENT_SUBNET_OCID}",
  "subnet_type": "private",
  "tenancy_ocid": "${TENANCY_OCID}",
  "user_ssh_key": "${SSH_PUBLIC_KEY_BASE64}",
  "vcn_compartment_id": "${COMPARTMENT_OCID}",
  "vm_compartment_id": "${COMPARTMENT_OCID}"
}
JSON
Create the Resource Manager stack:
export AGENT_FACTORY_STACK_OCID="$(
  oci resource-manager stack create \
    --compartment-id "$COMPARTMENT_OCID" \
    --display-name "Oracle AI Database Private Agent Factory" \
    --description "Oracle AI Database Private Agent Factory Marketplace deployment" \
    --terraform-version "1.5.x" \
    --config-source /tmp/oracle-ai-database-private-agent-factory.zip \
    --variables file:///tmp/agent-factory-stack-vars.json \
    --freeform-tags "{\"marketplace-listing-id\":\"${AGENT_FACTORY_MARKETPLACE_LISTING_OCID}\"}" \
    --wait-for-state ACTIVE \
    --query 'data.id' \
    --raw-output
)"

echo "AGENT_FACTORY_STACK_OCID=${AGENT_FACTORY_STACK_OCID}"
Run the apply job:
oci resource-manager job create-apply-job \
  --stack-id "$AGENT_FACTORY_STACK_OCID" \
  --display-name "agent-factory-apply" \
  --execution-plan-strategy AUTO_APPROVED \
  --wait-for-state SUCCEEDED \
  --wait-for-state FAILED
Find the Marketplace-created Agent Factory VM. In the current Marketplace deployment, the VM display name is usually AgentFactoryVM.
oci compute instance list \
  --compartment-id "$COMPARTMENT_OCID" \
  --all \
  --query 'data[?"lifecycle-state"!=`TERMINATED`].{name:"display-name",state:"lifecycle-state",id:id}' \
  --output table
Set the VM OCID:
export AGENT_FACTORY_INSTANCE_OCID="<marketplace-agent-factory-instance-ocid>"Capture the private and public IP values:
export AGENT_FACTORY_PRIVATE_IP="$(
  oci compute instance list-vnics \
    --compartment-id "$COMPARTMENT_OCID" \
    --instance-id "$AGENT_FACTORY_INSTANCE_OCID" \
    --query 'data[0]."private-ip"' \
    --raw-output
)"

export AGENT_FACTORY_PUBLIC_IP="$(
  oci compute instance list-vnics \
    --compartment-id "$COMPARTMENT_OCID" \
    --instance-id "$AGENT_FACTORY_INSTANCE_OCID" \
    --query 'data[0]."public-ip"' \
    --raw-output
)"

printf '%s\n' \
  "AGENT_FACTORY_PRIVATE_IP=${AGENT_FACTORY_PRIVATE_IP}" \
  "AGENT_FACTORY_PUBLIC_IP=${AGENT_FACTORY_PUBLIC_IP}"
The public IP should be empty. If the Marketplace VM has a public IP, stop and fix the Marketplace stack settings before continuing.
Validate SSH through the bootstrap VM:
ssh -J opc@"$BOOTSTRAP_PUBLIC_IP" opc@"$AGENT_FACTORY_PRIVATE_IP" \
  "hostname && curl -s -H 'Authorization: Bearer Oracle' http://169.254.169.254/opc/v2/instance/ | head"
Step 5: Install Ollama on the Marketplace Agent Factory VM
Install Ollama directly on the private Agent Factory VM host. This step requires the temporary NAT route from Step 2, because the VM needs outbound access to download Ollama and pull the model.
First, open an SSH session to the private VM through the bootstrap host:
ssh -J opc@"$BOOTSTRAP_PUBLIC_IP" opc@"$AGENT_FACTORY_PRIVATE_IP"Run the remaining commands on the private Agent Factory VM.
Set the model name. Pick a model that fits the VM shape. The example uses an 8B-class model for a simple demo; use a smaller model if you are testing on a constrained shape.
export OLLAMA_MODEL="${OLLAMA_MODEL:-llama3.1:8b}"Install Ollama using the official Linux installer:
sudo dnf install -y zstd curl jq

curl -fsSL https://ollama.com/install.sh -o /tmp/install-ollama.sh
chmod +x /tmp/install-ollama.sh
sudo /tmp/install-ollama.sh
If the installer prints No NVIDIA/AMD GPU detected, that is acceptable for this walkthrough. Ollama will run in CPU-only mode, which is slower but still enough to validate the private Agent Factory and Database Tools MCP flow. Use a smaller model if response time becomes a problem.
Agent Factory runs in containers. To make the Ollama service reachable from those containers, configure Ollama to listen on the VM host interface. Do not add an OCI security-list ingress rule for port 11434; the port should remain private to this host and its local/container networking path.
sudo mkdir -p /etc/systemd/system/ollama.service.d

cat <<'EOF' | sudo tee /etc/systemd/system/ollama.service.d/override.conf
[Service]
Environment="OLLAMA_HOST=0.0.0.0:11434"
Environment="OLLAMA_CONTEXT_LENGTH=4096"
EOF

sudo systemctl daemon-reload
sudo systemctl enable --now ollama
sudo systemctl restart ollama
Verify that Ollama is running:
ollama -v
curl -s http://127.0.0.1:11434/api/version
Pull the model:
ollama pull "$OLLAMA_MODEL"
ollama list
Run a local generation test from the private VM:
curl -s http://127.0.0.1:11434/api/generate \
  -H "Content-Type: application/json" \
  -d "{\"model\":\"${OLLAMA_MODEL}\",\"prompt\":\"Reply with exactly: ollama-ok\",\"stream\":false}" \
  | jq -r '.response'
Expected output:
ollama-okKeep these values for the Agent Factory LLM configuration step. In the Marketplace deployment, Agent Factory runs in Podman containers, and host.containers.internal resolves from the container to the VM host where Ollama is running.
printf '%s\n' \
  "export OLLAMA_MODEL=${OLLAMA_MODEL}" \
  "export OLLAMA_ENDPOINT_FOR_AGENT_FACTORY=http://host.containers.internal:11434"
When Agent Factory asks for the Ollama endpoint, use:
http://host.containers.internal:11434If that hostname does not resolve in your container runtime, use the Agent Factory VM private IP as a fallback:
http://<agent-factory-private-ip>:11434From your workstation, exit the private VM shell:
exitStep 6: Create the Agent Factory repository schema and demo table
The foundation post already created the private Autonomous Database and Database Tools connection. Agent Factory still needs its repository users in that database. This step creates only the Agent Factory-specific schema objects and a small demo table, using the existing Database Tools connection so database access stays on the managed private path.
Confirm the foundation values are present:
echo "ADB_OCID=${ADB_OCID}"
echo "DBTOOLS_CONNECTION_OCID=${DBTOOLS_CONNECTION_OCID}"
Agent Factory expects a runtime user and a read-only helper user named AAI_RO_<runtime_user>, with the same password.
export PAF_REPO_USER="PAF_REPO"
export PAF_REPO_RO_USER="AAI_RO_${PAF_REPO_USER}"

printf "Agent Factory repository user password: "
read -s PAF_REPO_PASSWORD
echo
Create the SQL file that Database Tools will execute:
cat > /tmp/paf-repository-and-demo.sql <<SQL
CREATE USER ${PAF_REPO_USER} IDENTIFIED BY "${PAF_REPO_PASSWORD}" DEFAULT TABLESPACE USERS QUOTA UNLIMITED ON USERS;
GRANT CREATE SESSION, CREATE TABLE, CREATE SEQUENCE, CREATE TRIGGER, CREATE TYPE, CREATE PROCEDURE, CREATE VIEW, CREATE SYNONYM TO ${PAF_REPO_USER};
GRANT READ, WRITE ON DIRECTORY DATA_PUMP_DIR TO ${PAF_REPO_USER};
GRANT SELECT ON V\$PARAMETER TO ${PAF_REPO_USER};

CREATE USER ${PAF_REPO_RO_USER} IDENTIFIED BY "${PAF_REPO_PASSWORD}" ACCOUNT UNLOCK;
GRANT CREATE SESSION TO ${PAF_REPO_RO_USER};

CREATE TABLE admin.demo_orders (
  order_id NUMBER GENERATED BY DEFAULT AS IDENTITY PRIMARY KEY,
  customer_name VARCHAR2(100),
  order_status VARCHAR2(30),
  order_total NUMBER(10,2),
  created_at TIMESTAMP DEFAULT SYSTIMESTAMP
);

INSERT INTO admin.demo_orders (customer_name, order_status, order_total)
VALUES ('Acme Manufacturing', 'SHIPPED', 1250.75);

INSERT INTO admin.demo_orders (customer_name, order_status, order_total)
VALUES ('Northwind Labs', 'PENDING', 482.20);

INSERT INTO admin.demo_orders (customer_name, order_status, order_total)
VALUES ('Contoso Retail', 'DELAYED', 4300.00);

COMMIT;
SQL
Run the repository and demo setup SQL through the Database Tools runtime connection:
if [ "$PAF_REPO_RO_USER" != "AAI_RO_${PAF_REPO_USER}" ]; then
  echo "PAF_REPO_RO_USER must be AAI_RO_${PAF_REPO_USER}; current value is ${PAF_REPO_RO_USER}" >&2
else
  export DATABASE_SETUP_SQL="$(cat /tmp/paf-repository-and-demo.sql)"

  export DATABASE_SETUP_REQUEST="$(
    jq -nc \
      --arg statementText "$DATABASE_SETUP_SQL" \
      '{
        type: "STANDARD",
        statementText: $statementText
      }'
  )"

  oci dbtools-runtime connection execute-sql sync \
    --connection-id "$DBTOOLS_CONNECTION_OCID" \
    --request-input "$DATABASE_SETUP_REQUEST"
fi
Verify that both repository users exist:
export REPO_USER_VERIFY_REQUEST="$(
  jq -nc \
    --arg statementText "select username, account_status from dba_users where username in (upper('${PAF_REPO_USER}'), upper('${PAF_REPO_RO_USER}')) order by username" \
    '{
      type: "STANDARD",
      statementText: $statementText
    }'
)"

oci dbtools-runtime connection execute-sql sync \
  --connection-id "$DBTOOLS_CONNECTION_OCID" \
  --request-input "$REPO_USER_VERIFY_REQUEST"
The result must include both ${PAF_REPO_USER} and ${PAF_REPO_RO_USER}. If ${PAF_REPO_RO_USER} is missing, Agent Factory fails the repository connection check with an error like Required read-only user AAI_RO_PAF_REPO does not exist.
Step 7: Configure Agent Factory and apply the MCP callback patch
Open Agent Factory through an SSH tunnel. This is the browser tunnel referenced later in the post: your browser connects to https://127.0.0.1:8443, and SSH forwards that traffic through the bootstrap VM to Agent Factory on the private VM.
ssh -L 8443:${AGENT_FACTORY_PRIVATE_IP}:8080 opc@"$BOOTSTRAP_PUBLIC_IP"Then open:
https://127.0.0.1:8443/agentFactory/Use the setup wizard to configure the Agent Factory server. Oracle’s Marketplace install guide shows the same first-run configuration flow: Install Oracle AI Database Private Agent Factory from OCI Marketplace.
- The first Agent Factory admin user.
- The Agent Factory repository database from Step 6.
- Component installation.
- Ollama as the LLM provider.
- The Ollama endpoint from Step 5.
- The Ollama model name from Step 5.
- Local or default embeddings unless your agent uses retrieval features.
A patch may be required before the MCP OAuth callback works correctly through the /agentFactory base path. Apply this after the first-run setup has installed the Agent Factory components and before adding the Database Tools MCP source.
Download the patch script from this blog and copy it to the private Agent Factory VM:
curl -fsSL \
  https://www.nikhleshagrawal.dev/downloads/patch_mcp_oauth_redirect_basepath.sh \
  -o /tmp/patch_mcp_oauth_redirect_basepath.sh

scp -J opc@"$BOOTSTRAP_PUBLIC_IP" \
  /tmp/patch_mcp_oauth_redirect_basepath.sh \
  opc@"$AGENT_FACTORY_PRIVATE_IP":/tmp/patch_mcp_oauth_redirect_basepath.sh
The Marketplace deployment runs the Agent Factory containers as rootless Podman containers owned by opc, so run the patch as opc, not with sudo.
ssh -J opc@"$BOOTSTRAP_PUBLIC_IP" opc@"$AGENT_FACTORY_PRIVATE_IP" \
  'podman ps -a --format "table {{.Names}}\t{{.Status}}\t{{.Image}}"'
If the container name is different from oracle-applied-ai-label, update the script before running it:
export AGENT_FACTORY_CONTAINER_NAME="oracle-applied-ai-label"

ssh -J opc@"$BOOTSTRAP_PUBLIC_IP" opc@"$AGENT_FACTORY_PRIVATE_IP" \
  "sed -i 's/^CONTAINER_NAME=.*/CONTAINER_NAME=\"${AGENT_FACTORY_CONTAINER_NAME}\"/' /tmp/patch_mcp_oauth_redirect_basepath.sh"
Run the patch:
ssh -J opc@"$BOOTSTRAP_PUBLIC_IP" opc@"$AGENT_FACTORY_PRIVATE_IP" \
  "chmod +x /tmp/patch_mcp_oauth_redirect_basepath.sh && /tmp/patch_mcp_oauth_redirect_basepath.sh"
Step 8: Bring in the managed Database Tools MCP values
This step assumes the managed Database Tools MCP layer already exists. If you have not created it yet, finish Create a Private Managed Database Tools MCP Server in OCI first, then return here with the values from that post.
At minimum, the Agent Factory setup needs these values:
export DBTOOLS_MCP_SERVER_OCID="<database-tools-mcp-server-ocid>"
export DBTOOLS_MCP_ENDPOINT="<database-tools-mcp-endpoint-url>"
export DBTOOLS_MCP_TOOLSET_OCID="<database-tools-mcp-toolset-ocid>"
export DBTOOLS_MCP_DOMAIN_APP_ID="<identity-domain-app-id-created-for-the-mcp-server>"
export DBTOOLS_MCP_SCOPE="urn:opc:dbtools:mcpserver:${DBTOOLS_MCP_SERVER_OCID}mcp:all"
export IDENTITY_DOMAIN_OCID="<identity-domain-ocid>"
export IDENTITY_DOMAIN_URL="<identity-domain-url>"
The MCP server should already have:
- A Database Tools connection to the private Autonomous Database.
- A SQL toolset with
schema_information,sql_run, andrequest_status. - The Codex validation OAuth client from the foundation post, if you tested with Codex.
- A separate confidential OAuth client for Agent Factory, attached to the same MCP server.
- The authorizing identity-domain user assigned to
MCP_Operator. - IAM policy allowing MCP invocation from the Agent Factory private subnet.
Step 9: Create Private Service Access for Database Tools MCP Server
Create a Private Service Access endpoint for Database Tools MCP Server in the Agent Factory private subnet. This is the private network path from the Agent Factory VM to the OCI-managed MCP server.
Create the PSA endpoint from the Console:
- Open the VCN used for this walkthrough.
- Open Private service access.
- Select Create private service access endpoint.
- Select Database Tools MCP Server as the service.
- Select the Agent Factory private subnet.
- Use
${DEPLOYMENT_PREFIX}-dbtools-mcp-psaas the display name. - Create the endpoint and wait until it is active.
Then capture the endpoint from CLI:
oci psa private-service-access list \
  --compartment-id "$COMPARTMENT_OCID" \
  --all \
  --output json > /tmp/paf-private-service-accesses.json

export DBTOOLS_MCP_PSA_OCID="$(
  jq -r --arg name "${DEPLOYMENT_PREFIX}-dbtools-mcp-psa" --arg vcn "$VCN_OCID" '
    (.data.items // .data)[]
    | select((.["display-name"] // .displayName) == $name)
    | select((.["lifecycle-state"] // .lifecycleState) == "ACTIVE")
    | select((.["vcn-id"] // .vcnId // $vcn) == $vcn)
    | .id
  ' /tmp/paf-private-service-accesses.json | head -n 1
)"

oci psa private-service-access get \
  --private-service-access-id "$DBTOOLS_MCP_PSA_OCID" \
  --output json > /tmp/paf-dbtools-mcp-psa.json

export DBTOOLS_MCP_PSA_FQDN="$(
  jq -r '.data.fqdn // .data["dns-name"] // .data.dnsName // empty' /tmp/paf-dbtools-mcp-psa.json
)"

export DBTOOLS_MCP_PSA_PRIVATE_IP="$(
  jq -r '.data["ipv4-ip"] // .data.ipv4Ip // .data.privateIp // empty' /tmp/paf-dbtools-mcp-psa.json
)"
Step 10: Add Database Tools MCP Server to Agent Factory
Open Agent Factory through the browser tunnel, add the Database Tools MCP Server as an MCP source, authorize it, and confirm that Agent Factory can list the toolset.
If the PSA endpoint returns a private IP but no FQDN, map the Database Tools MCP endpoint hostname to the PSA private IP on the Agent Factory VM. This keeps the MCP URL hostname unchanged for TLS and OAuth, while routing the connection to the private PSA endpoint.
export DBTOOLS_MCP_ENDPOINT_HOST="$(
  printf '%s\n' "$DBTOOLS_MCP_ENDPOINT" | sed -E 's#^https?://([^/:]+).*#\1#'
)"

echo "DBTOOLS_MCP_ENDPOINT=${DBTOOLS_MCP_ENDPOINT}"
echo "DBTOOLS_MCP_ENDPOINT_HOST=${DBTOOLS_MCP_ENDPOINT_HOST}"
echo "DBTOOLS_MCP_PSA_PRIVATE_IP=${DBTOOLS_MCP_PSA_PRIVATE_IP}"
Add the private host mapping on the Agent Factory VM:
ssh -J opc@"$BOOTSTRAP_PUBLIC_IP" opc@"$AGENT_FACTORY_PRIVATE_IP" \
  "grep -qE '(^|[[:space:]])${DBTOOLS_MCP_ENDPOINT_HOST}([[:space:]]|$)' /etc/hosts || echo '${DBTOOLS_MCP_PSA_PRIVATE_IP} ${DBTOOLS_MCP_ENDPOINT_HOST}' | sudo tee -a /etc/hosts"
Validate that the private VM resolves the MCP hostname to the PSA private IP:
ssh -J opc@"$BOOTSTRAP_PUBLIC_IP" opc@"$AGENT_FACTORY_PRIVATE_IP" \
  "getent hosts ${DBTOOLS_MCP_ENDPOINT_HOST}"
The output should show the PSA private IP, for example:
10.90.20.53 <database-tools-mcp-hostname>Then validate TLS to the MCP endpoint hostname from the Agent Factory VM. This confirms that the private IP path still presents the certificate for the original Database Tools MCP hostname.
ssh -J opc@"$BOOTSTRAP_PUBLIC_IP" opc@"$AGENT_FACTORY_PRIVATE_IP" \
  "echo | openssl s_client -connect '${DBTOOLS_MCP_ENDPOINT_HOST}:443' -servername '${DBTOOLS_MCP_ENDPOINT_HOST}' -brief"
The output should show a successful TLS connection and Verification: OK.
You can also probe the exact MCP endpoint URL with curl:
ssh -J opc@"$BOOTSTRAP_PUBLIC_IP" opc@"$AGENT_FACTORY_PRIVATE_IP" \
  "curl -vk --http1.1 --connect-timeout 10 '${DBTOOLS_MCP_ENDPOINT}' 2>&1 | head -60"
The curl request may return an HTTP authentication or authorization error because no OAuth token is being sent. That is fine for this check; it means the request reached the MCP service through the private IP path.
If curl connects to the PSA private IP and then fails with OpenSSL SSL_connect: SSL_ERROR_SYSCALL, compare it with the openssl s_client result above. If openssl s_client succeeds with Verification: OK, the private route, SNI, and certificate path are working, and the curl result is not a security-list failure. Continue with the Agent Factory MCP authorization flow.
If both curl and openssl s_client fail, check that the PSA endpoint was created for Database Tools MCP Server, that the hostname in the URL is still the original MCP endpoint hostname, and that the private IP came from the active PSA endpoint in the same VCN.
For production, use OCI Private DNS instead of editing /etc/hosts. The /etc/hosts entry keeps the walkthrough small and makes the private path explicit.
Agent Factory blocks outbound URLs that resolve to private or non-routable IP addresses by default. Since this walkthrough intentionally routes the Database Tools MCP Server hostname to a PSA private IP, allow private outbound URLs in the Agent Factory repository settings before adding the MCP server.
This is a global Agent Factory setting. In this private deployment, the risk is constrained by subnet security rules and the IAM policy that restricts MCP invocation to the Agent Factory network source.
export AGENT_FACTORY_SETTINGS_OWNER="${PAF_REPO_USER}"

cat > /tmp/paf-allow-private-outbound.sql <<SQL
update ${AGENT_FACTORY_SETTINGS_OWNER}.AAI_APPLICATION_SETTINGS
set value = 'false'
where upper(field) = 'BLOCK_PRIVATE_OUTBOUND_URLS';

commit;
SQL

export ALLOW_PRIVATE_OUTBOUND_SQL="$(cat /tmp/paf-allow-private-outbound.sql)"

export ALLOW_PRIVATE_OUTBOUND_REQUEST="$(
  jq -nc \
    --arg statementText "$ALLOW_PRIVATE_OUTBOUND_SQL" \
    '{
      type: "STANDARD",
      statementText: $statementText
    }'
)"

oci dbtools-runtime connection execute-sql sync \
  --connection-id "$DBTOOLS_CONNECTION_OCID" \
  --request-input "$ALLOW_PRIVATE_OUTBOUND_REQUEST" \
  --output json
Open the Agent Factory UI through the SSH tunnel:
ssh -N \
  -L 8443:${AGENT_FACTORY_PRIVATE_IP}:8080 \
  opc@"$BOOTSTRAP_PUBLIC_IP"
Then open:
https://127.0.0.1:8443/agentFactory/In Agent Factory, open MCP Servers and add a new MCP server:
- Name:
${DEPLOYMENT_PREFIX}-dbtools-mcp - URL:
${DBTOOLS_MCP_ENDPOINT} - Authentication mode:
OAuth - OAuth client: the existing confidential client
mcp-remote-confidential - OAuth client ID: the client ID from the confidential client
- OAuth client secret: the client secret saved when the confidential client was created
- Scope:
${DBTOOLS_MCP_SCOPE} - Authorization URL:
${IDENTITY_DOMAIN_URL}/oauth2/v1/authorize - Token URL:
${IDENTITY_DOMAIN_URL}/oauth2/v1/token
This is intentionally not the same OAuth client used by the Codex validation in the foundation post. The same Database Tools MCP Server can have multiple OAuth clients attached. Codex uses a local loopback client without a secret, while Agent Factory uses the confidential client because it provides a client secret and uses the callback URL shown by the Agent Factory UI.
The form should look like this. The screenshot below redacts environment-specific endpoint, client, and scope values.
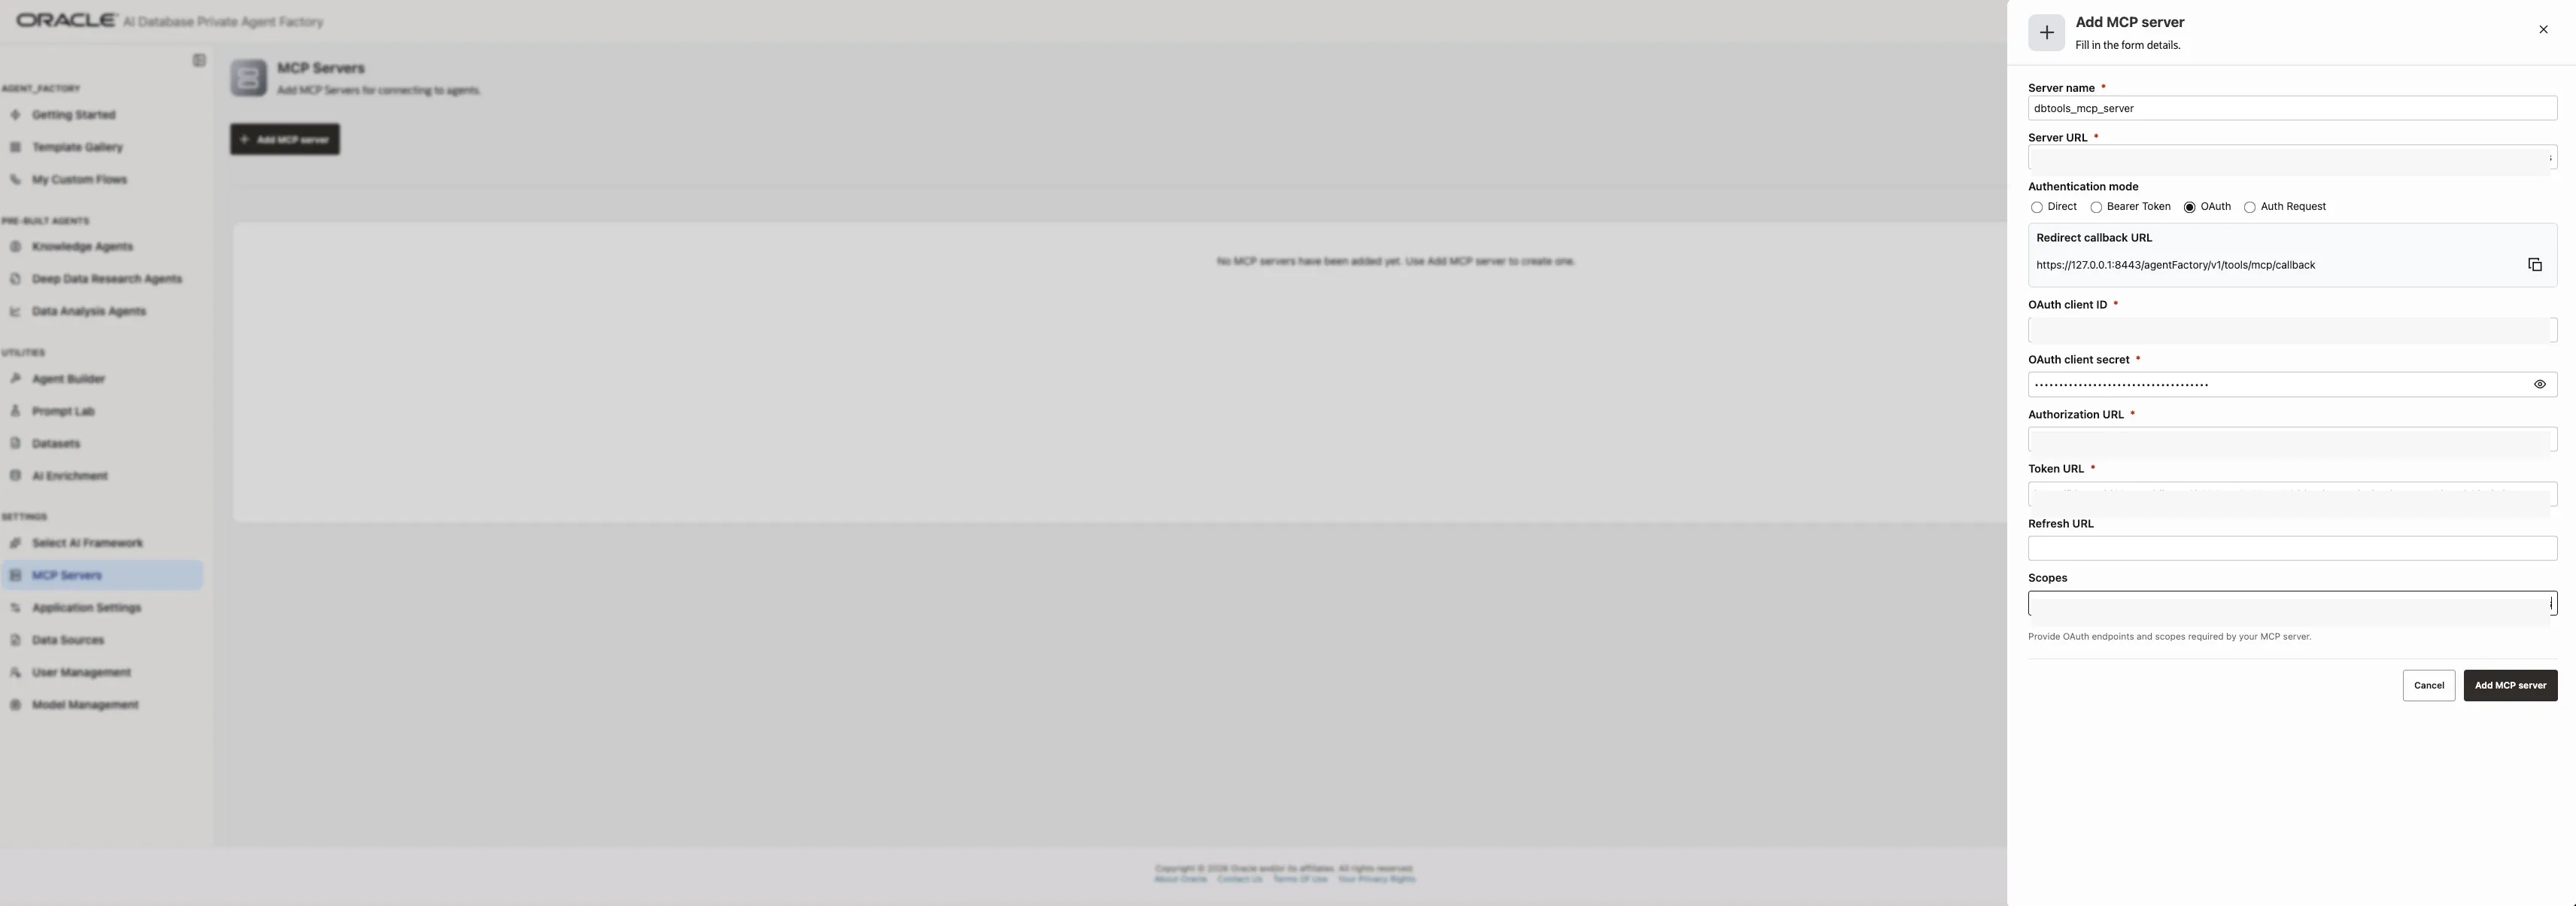
Use the OAuth client ID and current client secret from the confidential client in the OCI Console. Do not use AGENT_FACTORY_MCP_CLIENT_APP_ID as the OAuth client ID; that value is the Identity Domains SCIM application resource ID, not the OAuth clientId.
Use the redirect callback URL shown by Agent Factory when adding the MCP server. In this deployment, the callback must include the /agentFactory base path:
https://127.0.0.1:8443/agentFactory/v1/tools/mcp/callbackClick Request Authorization on the saved MCP server.
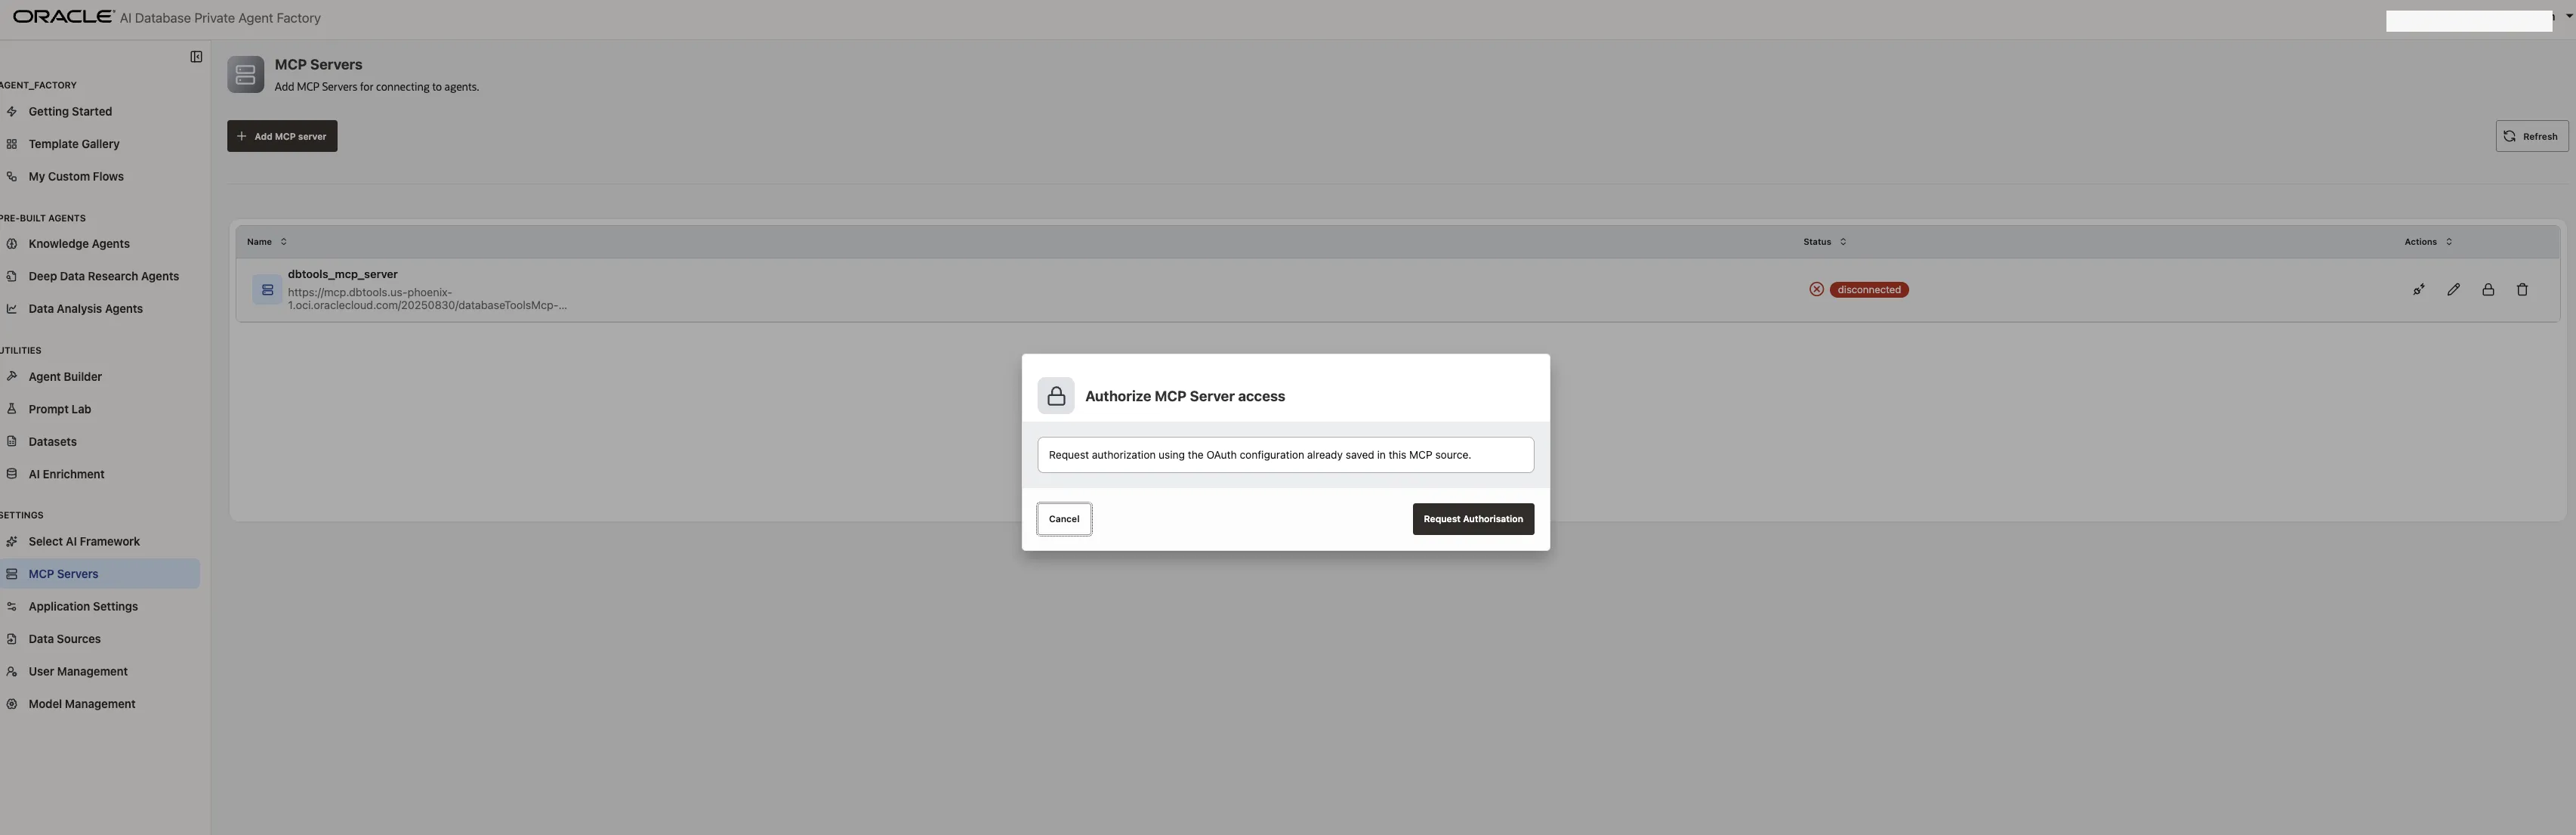
Sign in with the identity-domain user assigned to the MCP role and approve the consent request.
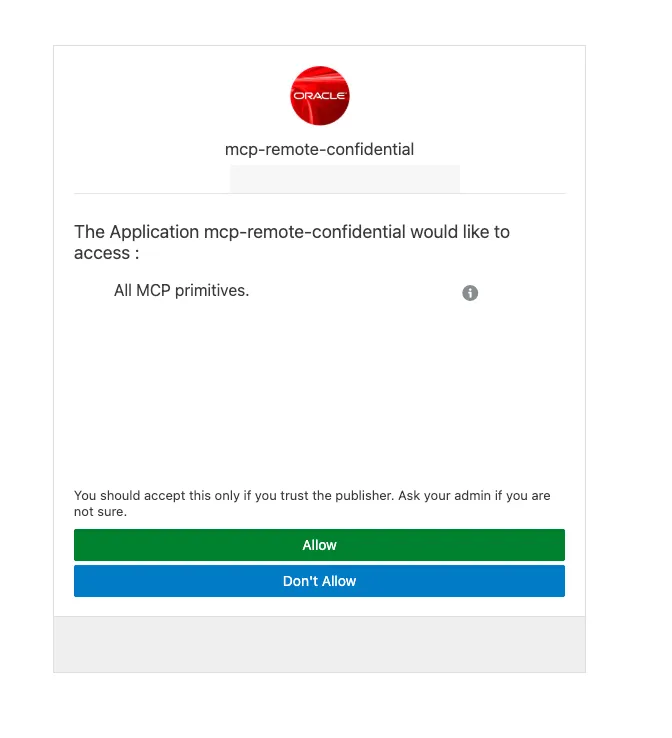
After authorization, Agent Factory should show the MCP server in the list.
Open the saved MCP server and confirm that the toolset lists the tools from the managed MCP Server:
schema_informationsql_runrequest_status
If tools do not list, first check the OAuth clientId and secret, the MCP OAuth callback patch, and the private hostname mapping to the PSA IP. If the source was created with stale OAuth state, delete the MCP source in Agent Factory and recreate it after those checks.
Step 11: Build the agent graph
Create a small Agent Builder graph that uses Ollama for reasoning and the Database Tools MCP Server for SQL access. Keep the first graph intentionally small so it is easy to debug.
Use this graph shape:
- Chat Input
- Prompt
- Agent
- MCP Server using
${DEPLOYMENT_PREFIX}-built-in-sql-tools - Chat Output
Connect the graph like this:
Chat Input -> Prompt -> Agent -> MCP Server
Agent -> Chat Output
The resulting Agent Builder flow should keep the prompt message path and the MCP tools path connected to the Agent node.
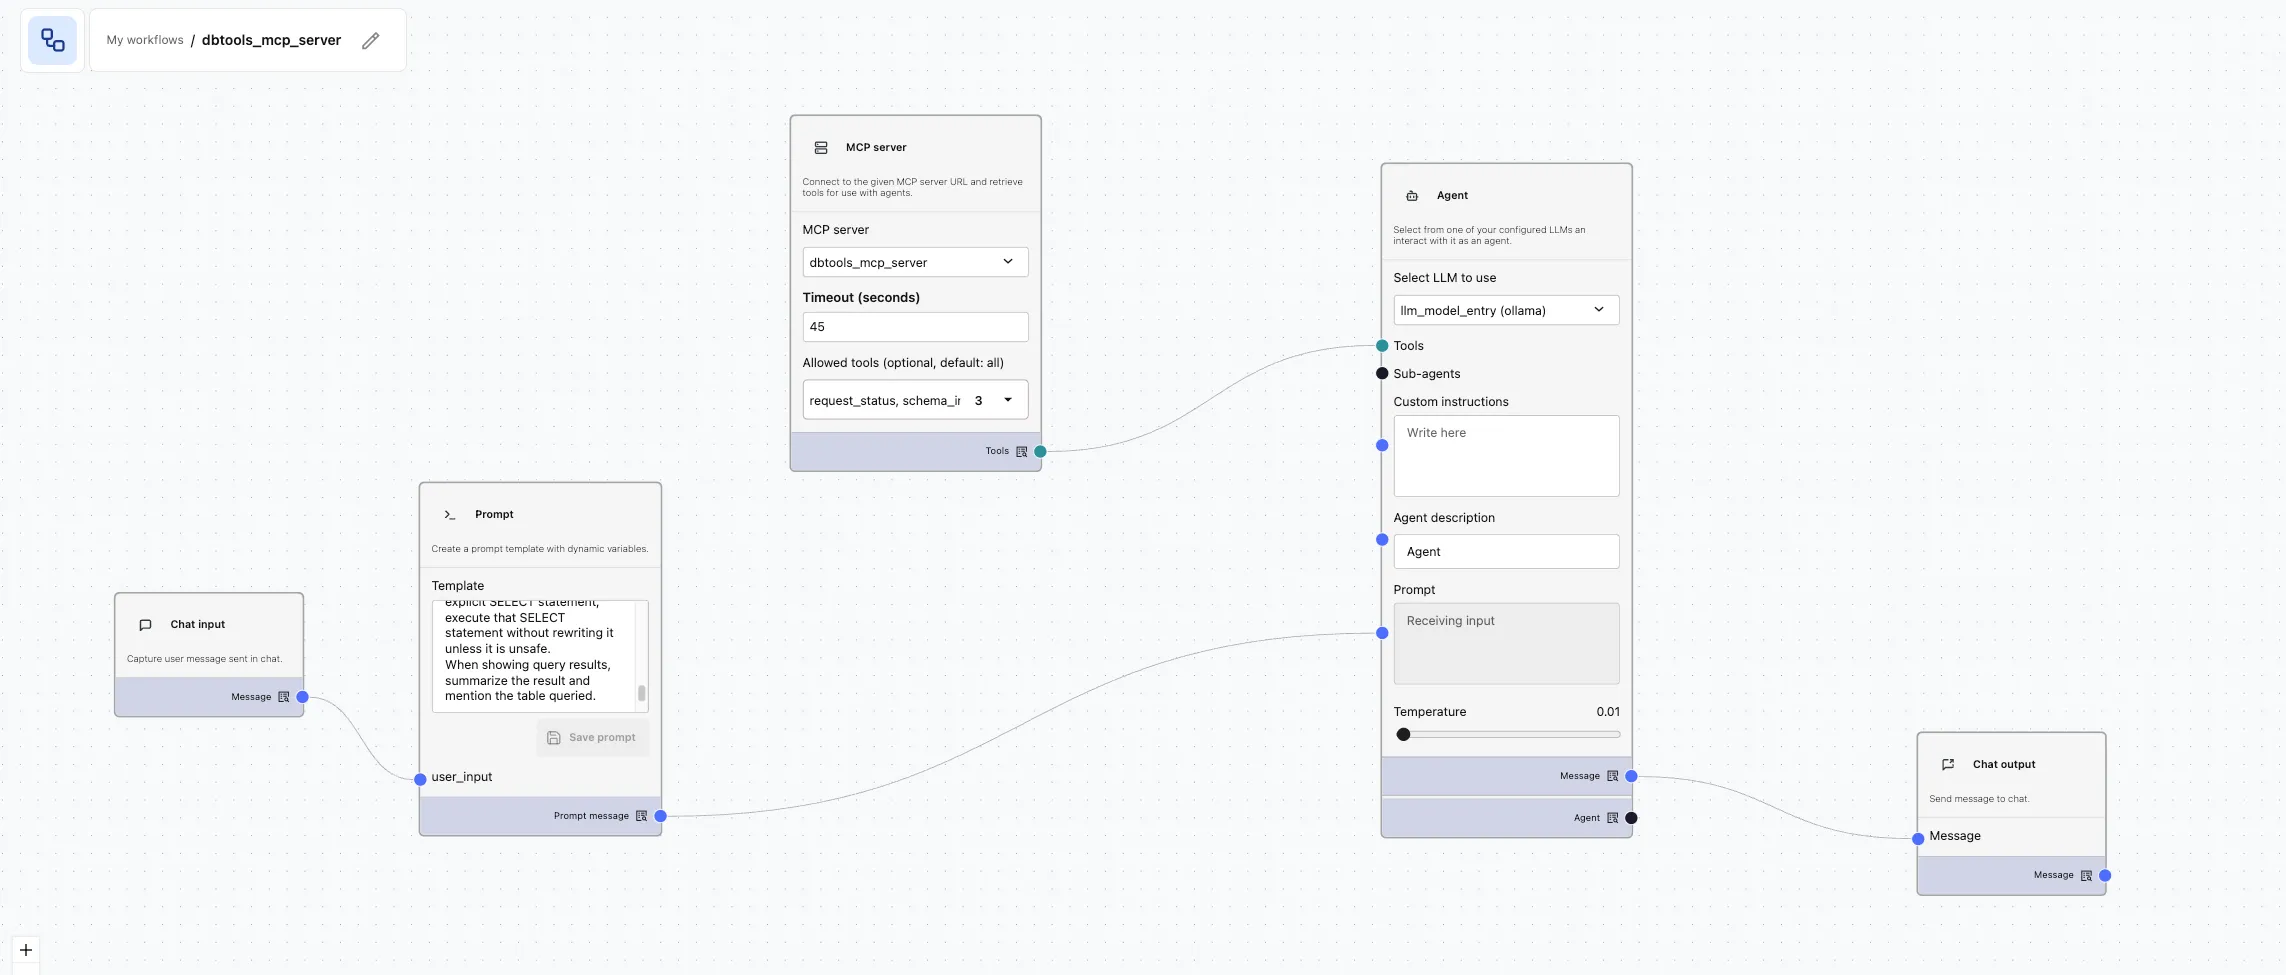
Configure the Agent node as the LLM-backed reasoning step, using the Ollama model from Step 5. The MCP Server node exposes the Database Tools MCP tools to that Agent.
Configure the Prompt or Agent instructions narrowly for the demo. If you use a Prompt node, include {{user_input}} so the message from Chat Input is passed into the Agent:
You are a database assistant for a demo Oracle Autonomous Database.
Use the Database Tools MCP SQL tools when answering questions about database tables.
Prefer schema_information before sql_run when table structure is unclear.
Use Oracle SQL syntax only.
Only run SELECT statements.
Do not run INSERT, UPDATE, DELETE, DDL, PL/SQL, or administrative commands.
Do not use LIMIT or TOP. For row limiting, use FETCH FIRST n ROWS ONLY.
Do not add a trailing semicolon to SQL sent to sql_run.
The demo table is ADMIN.DEMO_ORDERS with columns ORDER_ID, CUSTOMER_NAME, ORDER_STATUS, ORDER_TOTAL, and CREATED_AT.
When the user supplies an explicit SELECT statement, execute that SELECT statement without rewriting it unless it is unsafe.
When showing query results, summarize the result and mention the table queried.

User request:
{{user_input}}
Connect the nodes so there is one executable path from Chat Input to Chat Output. The MCP Server node must be reachable from the Agent node so the agent can call the Database Tools SQL tools.
Avoid orphan nodes. Every node that should run must be connected into the graph path. An Orphan node detected in graph error usually means a node exists on the canvas but is not connected to the executable flow. Delete unused nodes from the canvas rather than leaving them disconnected.
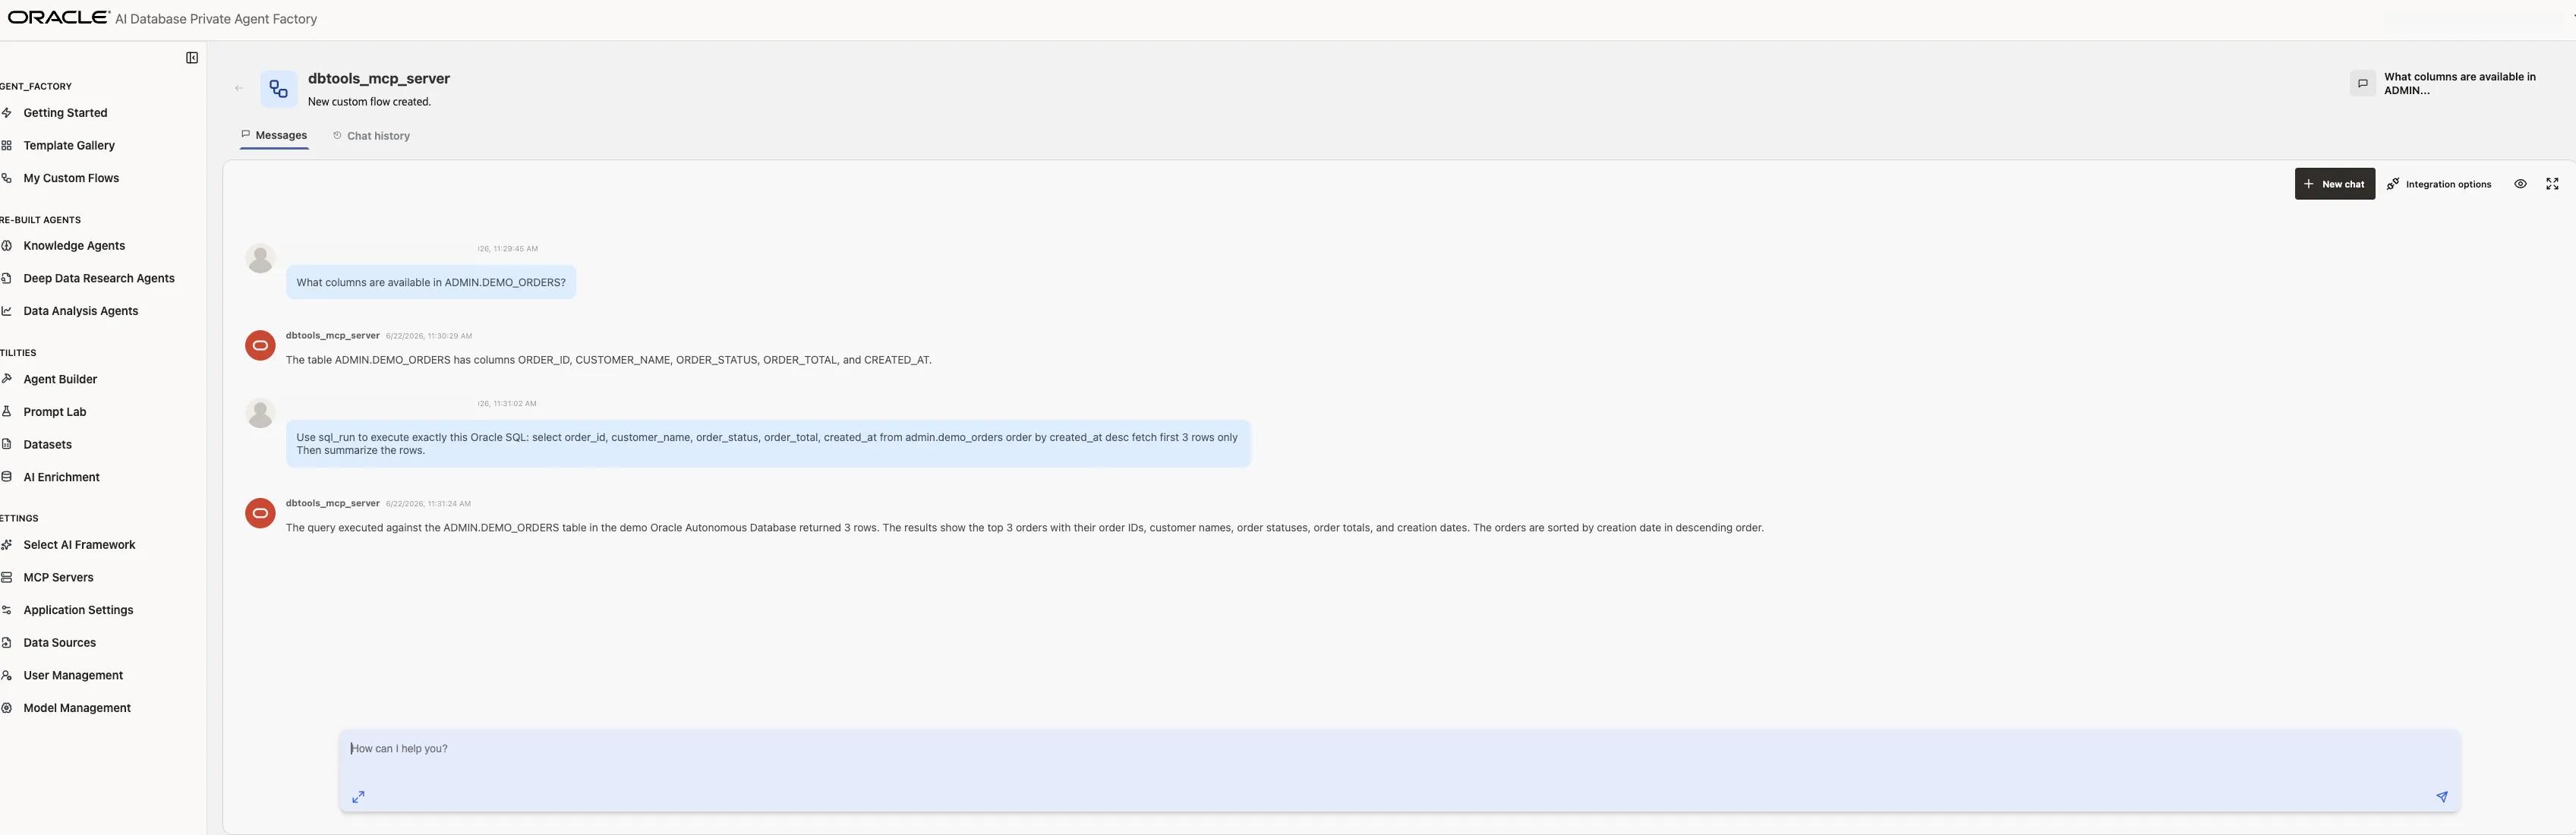
Test metadata discovery first:
What columns are available in ADMIN.DEMO_ORDERS?Then test SQL execution:
Use sql_run to execute exactly this Oracle SQL:
select order_id, customer_name, order_status, order_total, created_at
from admin.demo_orders
order by created_at desc
fetch first 3 rows only

Then summarize the rows.
For the SQL execution test, check that the request follows this path:
- Agent Factory calls the Database Tools MCP Server.
- The MCP Server invokes the Database Tools connection.
- Database Tools reaches the private Autonomous Database.
- The response contains rows or a summary from
ADMIN.DEMO_ORDERS.
The chat view should show the metadata discovery response and the SQL execution summary coming back through the agent.
A successful response from the run endpoint should look like this shape:
{
  "roomId": "...",
  "message": "The query was successful and returned three rows. The rows are: ..."
}
Save and publish the agent. The run endpoint accepts a published agent id; saving a draft graph is not enough. If you call the run endpoint with a draft, preview, or stale id, Agent Factory returns an error similar to:
{
  "errorMessages": [
    "The Agent Id Provided is not valid, please make sure that the agent is published"
  ]
}
After publishing, copy the run URL for the published agent. It should look like this:
https://127.0.0.1:8443/agentFactory/v1/agentBuilder/run/<agent-id>Keep that published run URL for the validation step.
Step 12: Validate from inside the private Agent Factory VM
Run the final validation from the private VM. The goal is to prove that Agent Factory has no public IP and can still run the database agent from inside the private network.
First, prove the Agent Factory VM does not have a public IP. This command executes on the private VM and reads the OCI instance metadata service:
ssh -J opc@"$BOOTSTRAP_PUBLIC_IP" opc@"$AGENT_FACTORY_PRIVATE_IP" \
  'curl -s -H "Authorization: Bearer Oracle" http://169.254.169.254/opc/v2/vnics/ |
   jq ".[] | {privateIp, publicIp, vnicId}"'
The publicIp value should be empty or null.
Validate local Ollama from inside the Agent Factory VM:
ssh -J opc@"$BOOTSTRAP_PUBLIC_IP" opc@"$AGENT_FACTORY_PRIVATE_IP" \
  'curl -s http://127.0.0.1:11434/api/version'
Validate the Database Tools MCP Server private path from inside the Agent Factory VM:
ssh -J opc@"$BOOTSTRAP_PUBLIC_IP" opc@"$AGENT_FACTORY_PRIVATE_IP" \
  "getent hosts ${DBTOOLS_MCP_ENDPOINT_HOST}"
The getent hosts output should resolve the Database Tools MCP hostname to the PSA private IP.
Finally, call the saved Agent Builder run URL from inside the private VM. Use /agentFactory/v1/loginValidation with HTTP Basic Auth to create an Agent Factory session cookie, then reuse that cookie for the agent run request.
SSH into the private VM:
ssh -J opc@"$BOOTSTRAP_PUBLIC_IP" opc@"$AGENT_FACTORY_PRIVATE_IP"Then run this on the private VM:
bash <<'SCRIPT'
set -euo pipefail

AGENT_FACTORY_BASE_URL="https://localhost:8080"
read -r -p "Published Agent Builder id: " PUBLISHED_AGENT_ID < /dev/tty

if [[ -z "$PUBLISHED_AGENT_ID" ]]; then
  printf "Published Agent Builder id is required.\n" >&2
  exit 1
fi

AGENT_FACTORY_RUN_PATH="/agentFactory/v1/agentBuilder/run/${PUBLISHED_AGENT_ID}"

read -r -p "Agent Factory username: " AGENT_FACTORY_USERNAME < /dev/tty
read -r -s -p "Agent Factory password: " AGENT_FACTORY_PASSWORD < /dev/tty
printf "\n" > /dev/tty

curl -k -sS \
  -D /tmp/agent-factory-login.headers \
  -c /tmp/agent-factory.cookies \
  -u "${AGENT_FACTORY_USERNAME}:${AGENT_FACTORY_PASSWORD}" \
  -H "Accept: application/json" \
  -H "Origin: ${AGENT_FACTORY_BASE_URL}" \
  -H "Referer: ${AGENT_FACTORY_BASE_URL}/agentFactory/" \
  "${AGENT_FACTORY_BASE_URL}/agentFactory/v1/loginValidation"

printf 'Calling %s%s\n' "$AGENT_FACTORY_BASE_URL" "$AGENT_FACTORY_RUN_PATH"

curl -k -sS -L \
  -X POST "${AGENT_FACTORY_BASE_URL}${AGENT_FACTORY_RUN_PATH}" \
  -b /tmp/agent-factory.cookies \
  -H "Origin: ${AGENT_FACTORY_BASE_URL}" \
  -H "Referer: ${AGENT_FACTORY_BASE_URL}/agentFactory/" \
  -H "Content-Type: application/json" \
  --data '{"message":"Use sql_run to execute exactly this Oracle SQL: select order_id, customer_name, order_status, order_total, created_at from admin.demo_orders order by created_at desc fetch first 3 rows only. Then summarize the rows."}'
SCRIPT
Enter the id from the published Agent Builder run URL when prompted for Published Agent Builder id. You still need this value because the session only authenticates the caller; the run path identifies which saved agent to invoke.
If you run the same validation from your laptop through an SSH tunnel instead of from inside the private VM, use the tunnel URL as the base URL, for example https://127.0.0.1:8443. Keep the same host and port for the login, validate, and run requests so the cookie jar matches the request host.
Use this server-side login flow only for local validation or for a trusted backend bridge. Do not expose the Agent Factory username, password, or session cookie to browser users. A public app should authenticate users itself and call Agent Factory from a backend it controls.
At this point the private path is proven:
- Agent Factory VM has no public IP.
- Ollama responds locally on the Agent Factory VM.
- Database Tools MCP Server resolves to the PSA private IP from the Agent Factory VM.
- Agent Factory can authorize and call the Database Tools MCP toolset.
- The agent can answer from
ADMIN.DEMO_ORDERSin the private Autonomous Database.
Step 13: Remove bootstrap access and clean up
The final runtime posture should not depend on the temporary NAT route. Remove that route first, but keep the NAT gateway itself until validation passes.
oci network route-table update \
  --rt-id "$PRIVATE_ROUTE_TABLE_OCID" \
  --route-rules '[]' \
  --force \
  --wait-for-state AVAILABLE
If validation fails and you need to roll back, restore the temporary NAT route:
oci network route-table update \
  --rt-id "$PRIVATE_ROUTE_TABLE_OCID" \
  --route-rules "[{\"cidrBlock\":\"0.0.0.0/0\",\"networkEntityId\":\"${NAT_GATEWAY_OCID}\"}]" \
  --force \
  --wait-for-state AVAILABLE
If you run the rollback command, public internet access from the private VM will work again until you remove the NAT route a second time.
With the NAT route removed, validate from the private Agent Factory VM while the bootstrap VM still exists:
ssh -J opc@"$BOOTSTRAP_PUBLIC_IP" opc@"$AGENT_FACTORY_PRIVATE_IP"Inside the private VM, public internet access should fail or time out:
curl -sS --connect-timeout 5 --max-time 10 https://ollama.com || \
  echo "expected: public internet path is not available"
Then rerun the published agent validation from Step 12. This is the runtime test that matters after NAT removal:
export AGENT_FACTORY_BASE_URL="https://localhost:8080"
export AGENT_FACTORY_RUN_PATH="/agentFactory/v1/agentBuilder/run/<published-agent-id>"

curl -k -sS -L \
  -X POST "${AGENT_FACTORY_BASE_URL}${AGENT_FACTORY_RUN_PATH}" \
  -b /tmp/agent-factory.cookies \
  -H "Origin: ${AGENT_FACTORY_BASE_URL}" \
  -H "Referer: ${AGENT_FACTORY_BASE_URL}/agentFactory/" \
  -H "Content-Type: application/json" \
  --data '{"message":"Use sql_run to execute exactly this Oracle SQL: select order_id, customer_name, order_status, order_total, created_at from admin.demo_orders order by created_at desc fetch first 3 rows only. Then summarize the rows."}'
If that succeeds, Agent Factory is no longer relying on the temporary NAT route for the local Ollama and Database Tools MCP Server path. At that point, delete the NAT gateway:
oci network nat-gateway delete \
  --nat-gateway-id "$NAT_GATEWAY_OCID" \
  --force
Keep the bootstrap VM until you are done with screenshots, troubleshooting, and any final browser access. It is also your SSH and browser-tunnel path back into the private Agent Factory VM. If you expect to administer the private VM later, stop the bootstrap VM instead of terminating it:
oci compute instance action \
  --instance-id "$BOOTSTRAP_INSTANCE_OCID" \
  --action STOP
When you no longer need this access path, or when you replace it with OCI Bastion, VPN, or FastConnect, terminate the bootstrap VM:
oci compute instance terminate \
  --instance-id "$BOOTSTRAP_INSTANCE_OCID" \
  --preserve-boot-volume false \
  --force \
  --wait-for-state TERMINATED
After the bootstrap VM is stopped or gone, you can remove its SSH/Agent Factory ingress from the private Agent Factory security list while keeping the private ADB and PSA rules. If you only stopped the bootstrap VM and plan to use it later, save the original ingress rules so you can restore them during maintenance.
oci network security-list update \
  --security-list-id "$AGENT_SECURITY_LIST_OCID" \
  --ingress-security-rules "[{\"source\":\"${AGENT_SUBNET_CIDR}\",\"protocol\":\"6\",\"tcpOptions\":{\"destinationPortRange\":{\"min\":1522,\"max\":1522}}},{\"source\":\"${AGENT_SUBNET_CIDR}\",\"protocol\":\"6\",\"tcpOptions\":{\"destinationPortRange\":{\"min\":443,\"max\":443}}}]" \
  --egress-security-rules "[{\"destination\":\"${VCN_CIDR}\",\"protocol\":\"all\"}]" \
  --force \
  --wait-for-state AVAILABLE
The Internet Gateway can remain if the bootstrap subnet remains. The private Agent Factory subnet does not use the Internet Gateway unless its route table contains a default route to it, which this walkthrough does not configure. If you terminate the bootstrap VM and do not need a public administration subnet anymore, you can also remove the bootstrap subnet route to the Internet Gateway and delete the Internet Gateway as part of full environment cleanup.
The remaining private runtime is:
- Agent Factory VM with no public IP.
- Ollama running locally on the Agent Factory VM.
- Database Tools MCP Server reached through Private Service Access.
- Private Autonomous Database reached through Database Tools.
What this architecture enables
The walkthrough stops after proving the private runtime path. From there, the natural next step is an internal application in front of the published agent. Users do not need direct access to the Agent Factory UI; they can use a small portal deployed inside the private network, behind VPN, FastConnect, OCI Bastion-assisted administration, or an internal load balancer path that can reach Agent Factory.
Keep the authentication boundary on the backend. Based on the currently documented external invocation flow, the published Agent Factory endpoint is called with an Agent Factory session cookie, or by using /agentFactory/v1/loginValidation with an Agent Factory username and password to establish that session. Treat loginValidation as a backend integration mechanism, not something to expose to every employee browser.
One internal app pattern is:
- Employees authenticate to the internal portal with the enterprise identity provider.
- The portal backend maps identity groups to application roles.
- The backend decides which published agent, prompt template, and request type the employee is allowed to use.
- The backend calls Agent Factory from inside the VCN using a service-side Agent Factory credential or session.
- The backend logs the employee identity, role, selected agent, request category, and Agent Factory response metadata for audit.
For example, an operations portal could expose a page called Ask the Order Agent. A support engineer signs in with the enterprise identity provider and asks, “Which IoT orders failed in the last hour, and what should I check first?” The portal backend checks that the user can ask read-only order-status questions, then calls the published Agent Factory run endpoint from inside the VCN. The browser never receives Agent Factory credentials or session cookies.
For stronger authorization boundaries, do not rely only on prompt text. Create role-scoped published agents, role-scoped Database Tools connections or toolsets, and database grants that match the application roles. A support role might use an agent backed by read-only order views, while an operations lead might use a broader incident-analysis agent. If you need true per-employee data authorization all the way down to the database, put that logic in a custom backend or custom tool layer that receives the portal-verified employee identity and enforces policy before it touches data.
That keeps the user experience simple without widening the runtime path: Agent Factory stays on a private VM, Ollama stays local, Database Tools MCP Server stays on the PSA path, and database access still depends on the Database Tools connection, IAM policy, and database grants.
This proves the database-agent runtime path. If you later reauthorize MCP from the UI or refresh OAuth against a public identity endpoint, you may need outbound access for that setup operation. Keep setup-time egress separate from the runtime path.
Where to go next
If you want to reuse the Database Tools side of this setup without Agent Factory, start with Integrating IAM Authentication with OCI Database Tools Connections. It walks through a smaller private Autonomous Database and Database Tools connection pattern that can serve as a foundation for later MCP or agent work.
For a more application-focused version of the same access pattern, see Using Database Tools IAM and Proxy Authentication for IoT Operations Data Access. That post focuses on how an operations application can query private data through Database Tools while preserving user context.