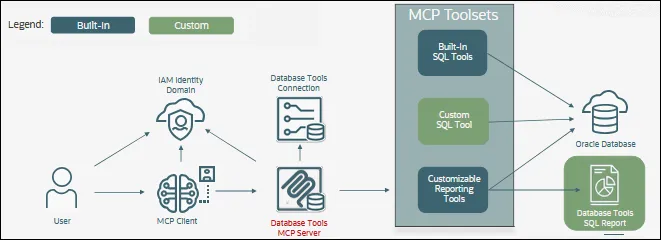
OCI Database Tools MCP Server gives MCP clients a managed endpoint for SQL access to databases supported by Database Tools connections. Database credentials stay in Database Tools and Vault, the MCP server is managed by OCI, and clients authorize through an identity-domain OAuth client.
The useful part of this setup is the boundary it creates: database credentials stay in Database Tools and Vault, while clients get a managed MCP endpoint with only the SQL tools you attach.
This build creates:
- A VCN and private subnet for the database and managed Database Tools path.
- A private Autonomous Database.
- A Database Tools connection to an Autonomous Database.
- A managed Database Tools MCP Server.
- A small SQL toolset with
schema_information,sql_run, andrequest_status. - An OAuth client attachment.
- MCP app-role assignment for the user who will authorize the client.
- IAM policy for MCP invocation and Database Tools access.
- The endpoint, scope, and resource OCIDs needed to manage or call the MCP Server.
Overview
Oracle’s Database Tools MCP Server overview describes the service as a serverless way for MCP clients to use Database Tools connections and approved SQL tools. The built-in toolsets cover common SQL workflows, and custom tools can be added with SQL or PL/SQL when the built-ins are not enough.
The order matters. Create the private database path first, add Database Tools as the managed access layer, then expose a small MCP toolset. OAuth and IAM come last because the endpoint is only useful after a user can authorize to it and policy allows invocation.
Prerequisites
This walkthrough assumes you already have:
- An OCI compartment for the resources.
- An OCI Vault and key for Database Tools secrets.
- An identity domain for OAuth users and clients.
- OCI CLI configured with permissions to manage networking, Autonomous Database, Database Tools, IAM, and Vault resources.
Account note: this build uses private networking features, including a Database Tools private endpoint. If you continue into the Agent Factory post, it also uses Private Service Access. Use a paid or upgraded OCI account; an Always Free-only tenancy is not enough for these private endpoint and PSA paths.
Use the same shell variable names throughout:
export OCI_CLI_PROFILE="<oci-cli-profile>"
export OCI_CLI_REGION="us-phoenix-1"
export OCI_CLI_AUTH="security_token"

export OCI_REGION="$OCI_CLI_REGION"
export TENANCY_OCID="<tenancy-ocid>"
export COMPARTMENT_OCID="<compartment-ocid>"
export DEPLOYMENT_PREFIX="dbtools-mcp-demo"

export VCN_CIDR="10.90.0.0/16"
export PRIVATE_SUBNET_CIDR="10.90.20.0/24"
export ADB_DB_NAME="MCPDEMO"
export ADB_DISPLAY_NAME="${DEPLOYMENT_PREFIX}-adb"
export ADB_PRIVATE_ENDPOINT_LABEL="mcpdemo"
export ADB_COMPUTE_MODEL="ECPU"
export ADB_COMPUTE_COUNT="2"
export ADB_STORAGE_SIZE_IN_GBS="20"
export ADB_DB_VERSION="26ai"
export VAULT_OCID="<vault-ocid>"
export KEY_OCID="<key-ocid>"
export IDENTITY_DOMAIN_OCID="<identity-domain-ocid>"
Create the Private Network
Create a VCN, a private route table, and a private subnet. This subnet is used by the private Autonomous Database and the Database Tools private endpoint.
export VCN_OCID="$(
  oci network vcn create \
    --compartment-id "$COMPARTMENT_OCID" \
    --display-name "${DEPLOYMENT_PREFIX}-vcn" \
    --cidr-block "$VCN_CIDR" \
    --dns-label dbtmcp \
    --wait-for-state AVAILABLE \
    --query 'data.id' \
    --raw-output
)"

export PRIVATE_ROUTE_TABLE_OCID="$(
  oci network route-table create \
    --compartment-id "$COMPARTMENT_OCID" \
    --vcn-id "$VCN_OCID" \
    --display-name "${DEPLOYMENT_PREFIX}-private-rt" \
    --route-rules '[]' \
    --wait-for-state AVAILABLE \
    --query 'data.id' \
    --raw-output
)"

export PRIVATE_SECURITY_LIST_OCID="$(
  oci network security-list create \
    --compartment-id "$COMPARTMENT_OCID" \
    --vcn-id "$VCN_OCID" \
    --display-name "${DEPLOYMENT_PREFIX}-private-sl" \
    --egress-security-rules "[{\"destination\":\"${VCN_CIDR}\",\"protocol\":\"all\"}]" \
    --ingress-security-rules "[{\"source\":\"${PRIVATE_SUBNET_CIDR}\",\"protocol\":\"6\",\"tcpOptions\":{\"destinationPortRange\":{\"min\":1522,\"max\":1522}}},{\"source\":\"${PRIVATE_SUBNET_CIDR}\",\"protocol\":\"6\",\"tcpOptions\":{\"destinationPortRange\":{\"min\":443,\"max\":443}}}]" \
    --wait-for-state AVAILABLE \
    --query 'data.id' \
    --raw-output
)"

export PRIVATE_SUBNET_OCID="$(
  oci network subnet create \
    --compartment-id "$COMPARTMENT_OCID" \
    --vcn-id "$VCN_OCID" \
    --display-name "${DEPLOYMENT_PREFIX}-private-subnet" \
    --cidr-block "$PRIVATE_SUBNET_CIDR" \
    --dns-label agent \
    --route-table-id "$PRIVATE_ROUTE_TABLE_OCID" \
    --security-list-ids "[\"${PRIVATE_SECURITY_LIST_OCID}\"]" \
    --prohibit-public-ip-on-vnic true \
    --wait-for-state AVAILABLE \
    --query 'data.id' \
    --raw-output
)"
Create the Private Autonomous Database
Create the private Autonomous Database. This database is the target database for Database Tools MCP.
printf "ADB ADMIN password: "
read -s ADB_ADMIN_PASSWORD
echo

printf "ADB wallet password: "
read -s ADB_WALLET_PASSWORD
echo

export ADB_OCID="$(
  oci db autonomous-database create \
    --compartment-id "$COMPARTMENT_OCID" \
    --db-name "$ADB_DB_NAME" \
    --display-name "$ADB_DISPLAY_NAME" \
    --admin-password "$ADB_ADMIN_PASSWORD" \
    --db-workload OLTP \
    --compute-model "$ADB_COMPUTE_MODEL" \
    --compute-count "$ADB_COMPUTE_COUNT" \
    --data-storage-size-in-gbs "$ADB_STORAGE_SIZE_IN_GBS" \
    --db-version "$ADB_DB_VERSION" \
    --is-auto-scaling-enabled true \
    --is-mtls-connection-required true \
    --subnet-id "$PRIVATE_SUBNET_OCID" \
    --private-endpoint-label "$ADB_PRIVATE_ENDPOINT_LABEL" \
    --nsg-ids "[]" \
    --wait-for-state AVAILABLE \
    --max-wait-seconds 7200 \
    --query 'data.id' \
    --raw-output
)"

export ADB_WALLET_ZIP="/tmp/${DEPLOYMENT_PREFIX}-adb-wallet.zip"

oci db autonomous-database generate-wallet \
  --autonomous-database-id "$ADB_OCID" \
  --password "$ADB_WALLET_PASSWORD" \
  --file "$ADB_WALLET_ZIP" \
  --generate-type SINGLE
Create the Database Tools Connection
Unzip the wallet and create Vault secrets for the database password and cwallet.sso:
export ADB_WALLET_DIR="/tmp/${DEPLOYMENT_PREFIX}-adb-wallet"
mkdir -p "$ADB_WALLET_DIR"
unzip -o "$ADB_WALLET_ZIP" -d "$ADB_WALLET_DIR"

export DBTOOLS_CONNECTION_USER="ADMIN"
export DBTOOLS_CONNECTION_PASSWORD="$ADB_ADMIN_PASSWORD"

export DB_PASSWORD_SECRET_OCID="$(
  oci vault secret create-base64 \
    --compartment-id "$COMPARTMENT_OCID" \
    --vault-id "$VAULT_OCID" \
    --key-id "$KEY_OCID" \
    --secret-name "${DEPLOYMENT_PREFIX}-db-password" \
    --secret-content-content "$(printf '%s' "$DBTOOLS_CONNECTION_PASSWORD" | base64 | tr -d '\n')" \
    --wait-for-state ACTIVE \
    --query 'data.id' \
    --raw-output
)"

export DB_WALLET_SECRET_OCID="$(
  oci vault secret create-base64 \
    --compartment-id "$COMPARTMENT_OCID" \
    --vault-id "$VAULT_OCID" \
    --key-id "$KEY_OCID" \
    --secret-name "${DEPLOYMENT_PREFIX}-cwallet-sso" \
    --secret-content-content "$(base64 < "${ADB_WALLET_DIR}/cwallet.sso" | tr -d '\n')" \
    --wait-for-state ACTIVE \
    --query 'data.id' \
    --raw-output
)"
Create a Database Tools private endpoint so Database Tools can reach the private database:
export DBTOOLS_ENDPOINT_SERVICE_OCID="$(
  oci dbtools endpoint-service list \
    --compartment-id "$COMPARTMENT_OCID" \
    --name "DATABASE_TOOLS" \
    --lifecycle-state ACTIVE \
    --all \
    --query 'data.items[0].id' \
    --raw-output
)"

oci dbtools private-endpoint create \
  --compartment-id "$COMPARTMENT_OCID" \
  --endpoint-service-id "$DBTOOLS_ENDPOINT_SERVICE_OCID" \
  --subnet-id "$PRIVATE_SUBNET_OCID" \
  --display-name "${DEPLOYMENT_PREFIX}-dbtools-pe" \
  --wait-for-state SUCCEEDED \
  --wait-for-state FAILED \
  --max-wait-seconds 1800

export DBTOOLS_PRIVATE_ENDPOINT_OCID="$(
  oci dbtools private-endpoint list \
    --compartment-id "$COMPARTMENT_OCID" \
    --subnet-id "$PRIVATE_SUBNET_OCID" \
    --display-name "${DEPLOYMENT_PREFIX}-dbtools-pe" \
    --lifecycle-state ACTIVE \
    --all \
    --query 'data.items[0].id' \
    --raw-output
)"
Read the Autonomous Database connection descriptor and create the Database Tools connection:
oci db autonomous-database get \
  --autonomous-database-id "$ADB_OCID" \
  --output json > /tmp/dbtools-mcp-adb.json

export DBTOOLS_CONNECTION_STRING="$(
  jq -r '
    .data["connection-strings"].profiles[]
    | select(.["consumer-group"] == "HIGH")
    | .value
  ' /tmp/dbtools-mcp-adb.json
)"

cat > /tmp/dbtools-mcp-connection.json <<EOF
{
  "displayName": "${DEPLOYMENT_PREFIX}-adb-admin",
  "compartmentId": "${COMPARTMENT_OCID}",
  "runtimeSupport": "SUPPORTED",
  "runtimeIdentity": "AUTHENTICATED_PRINCIPAL",
  "connectionString": "${DBTOOLS_CONNECTION_STRING}",
  "userName": "${DBTOOLS_CONNECTION_USER}",
  "userPasswordSecretId": "${DB_PASSWORD_SECRET_OCID}",
  "keyStores": [
    {
      "keyStoreType": "SSO",
      "keyStoreContent": {
        "valueType": "SECRETID",
        "secretId": "${DB_WALLET_SECRET_OCID}"
      }
    }
  ],
  "privateEndpointId": "${DBTOOLS_PRIVATE_ENDPOINT_OCID}",
  "authenticationType": "PASSWORD",
  "relatedResource": {
    "entityType": "AUTONOMOUSDATABASE",
    "identifier": "${ADB_OCID}"
  }
}
EOF

oci dbtools connection create-oracle-database \
  --from-json file:///tmp/dbtools-mcp-connection.json \
  --wait-for-state SUCCEEDED \
  --wait-for-state FAILED \
  --max-wait-seconds 1800

export DBTOOLS_CONNECTION_OCID="$(
  oci dbtools connection list \
    --compartment-id "$COMPARTMENT_OCID" \
    --display-name "${DEPLOYMENT_PREFIX}-adb-admin" \
    --type ORACLE_DATABASE \
    --runtime-support SUPPORTED \
    --runtime-identity AUTHENTICATED_PRINCIPAL \
    --lifecycle-state ACTIVE \
    --all \
    --query 'data.items[0].id' \
    --raw-output
)"
Create the MCP Server and Toolset
Create the managed Database Tools MCP Server:
oci dbtools mcp-server create-mcp-server-default \
  --compartment-id "$COMPARTMENT_OCID" \
  --display-name "${DEPLOYMENT_PREFIX}-mcp-server" \
  --description "Managed Database Tools MCP Server" \
  --connection-id "$DBTOOLS_CONNECTION_OCID" \
  --domain-id "$IDENTITY_DOMAIN_OCID" \
  --runtime-identity RESOURCE_PRINCIPAL \
  --storage '{"type":"NONE"}' \
  --wait-for-state SUCCEEDED \
  --wait-for-state FAILED \
  --max-wait-seconds 1800

export DBTOOLS_MCP_SERVER_OCID="$(
  oci dbtools mcp-server list \
    --compartment-id "$COMPARTMENT_OCID" \
    --display-name "${DEPLOYMENT_PREFIX}-mcp-server" \
    --database-tools-connection-id "$DBTOOLS_CONNECTION_OCID" \
    --lifecycle-state ACTIVE \
    --all \
    --query 'data.items[0].id' \
    --raw-output
)"

export DBTOOLS_MCP_DOMAIN_APP_ID="$(
  oci dbtools mcp-server get \
    --mcp-server-id "$DBTOOLS_MCP_SERVER_OCID" \
    --query 'data."domain-app-id"' \
    --raw-output
)"

export DBTOOLS_MCP_ENDPOINT="$(
  oci dbtools mcp-server get \
    --mcp-server-id "$DBTOOLS_MCP_SERVER_OCID" \
    --query 'data.endpoints[0].endpoint' \
    --raw-output
)"
Create a small SQL toolset:
export DBTOOLS_MCP_TOOLSET_VERSION="4"

cat > /tmp/dbtools-mcp-tools.json <<'JSON'
[
  {
    "name": "sql_run",
    "status": "ENABLED",
    "allowedRoles": ["MCP_Operator", "MCP_Administrator"]
  },
  {
    "name": "schema_information",
    "status": "ENABLED",
    "allowedRoles": ["MCP_User", "MCP_Operator", "MCP_Administrator"]
  },
  {
    "name": "request_status",
    "status": "ENABLED",
    "allowedRoles": ["MCP_User", "MCP_Operator", "MCP_Administrator"]
  }
]
JSON

oci dbtools mcp-toolset create-mcp-toolset-built-in-sql-tools \
  --compartment-id "$COMPARTMENT_OCID" \
  --display-name "${DEPLOYMENT_PREFIX}-built-in-sql-tools" \
  --description "Built-in SQL tools for managed MCP demo" \
  --mcp-server-id "$DBTOOLS_MCP_SERVER_OCID" \
  --toolset-version "$DBTOOLS_MCP_TOOLSET_VERSION" \
  --default-execution-type SYNCHRONOUS \
  --tools file:///tmp/dbtools-mcp-tools.json \
  --wait-for-state SUCCEEDED \
  --wait-for-state FAILED \
  --max-wait-seconds 1800

export DBTOOLS_MCP_TOOLSET_OCID="$(
  oci dbtools mcp-toolset list \
    --compartment-id "$COMPARTMENT_OCID" \
    --display-name "${DEPLOYMENT_PREFIX}-built-in-sql-tools" \
    --mcp-server-id "$DBTOOLS_MCP_SERVER_OCID" \
    --type BUILT_IN_SQL_TOOLS \
    --lifecycle-state ACTIVE \
    --all \
    --query 'data.items[0].id' \
    --raw-output
)"
Configure OAuth and Roles
The MCP Server uses identity-domain OAuth clients. Browser-based or server-side applications commonly use a confidential client. Desktop tools and local MCP clients commonly use a public client. A Database Tools MCP Server can have more than one OAuth client attached, and each MCP client chooses the right attachment by sending its own OAuth client_id.
You can reuse an existing client or create one for this MCP server. After the client exists, attach it to the MCP Server from the OCI Console:
- Open Developer Services.
- Open Database Tools.
- Open MCP Servers.
- Open
${DEPLOYMENT_PREFIX}-mcp-server. - Attach the OAuth client.
Capture the identity-domain endpoint and MCP scope:
export IDENTITY_DOMAIN_URL="$(
  oci iam domain get \
    --domain-id "$IDENTITY_DOMAIN_OCID" \
    --query 'data.url' \
    --raw-output
)"

export DBTOOLS_MCP_SCOPE="urn:opc:dbtools:mcpserver:${DBTOOLS_MCP_SERVER_OCID}mcp:all"
Assign the authorizing user an MCP app role. Use MCP_Operator for SQL execution demos and MCP_User for metadata-only demos.
export IDENTITY_USER_NAME="<identity-domain-user-name-or-email>"
export MCP_APP_ROLE_NAME="MCP_Operator"

export IDENTITY_USER_ID="$(
  oci identity-domains \
    --endpoint "$IDENTITY_DOMAIN_URL" \
    users list \
    --filter "userName eq \"$IDENTITY_USER_NAME\"" \
    --all \
    --attributes 'id,userName,displayName' \
    --query 'data.resources[0].id' \
    --raw-output
)"

oci identity-domains \
  --endpoint "$IDENTITY_DOMAIN_URL" \
  app-roles list \
  --all \
  --attributes 'id,displayName,description,app' \
  --output json > /tmp/dbtools-mcp-app-roles.json

export MCP_APP_ROLE_ID="$(
  jq -r --arg app "$DBTOOLS_MCP_DOMAIN_APP_ID" --arg role "$MCP_APP_ROLE_NAME" '
    .data.resources[]
    | select((.app.value // .app.id // "") == $app)
    | select((.["display-name"] // .displayName) == $role)
    | .id
  ' /tmp/dbtools-mcp-app-roles.json | head -n 1
)"

cat > /tmp/dbtools-mcp-role-grant.json <<JSON
{
  "schemas": [
    "urn:ietf:params:scim:schemas:oracle:idcs:Grant"
  ],
  "grantMechanism": "ADMINISTRATOR_TO_USER",
  "grantee": {
    "type": "User",
    "value": "${IDENTITY_USER_ID}"
  },
  "app": {
    "value": "${DBTOOLS_MCP_DOMAIN_APP_ID}"
  },
  "entitlement": {
    "attributeName": "appRoles",
    "attributeValue": "${MCP_APP_ROLE_ID}"
  }
}
JSON

oci identity-domains \
  --endpoint "$IDENTITY_DOMAIN_URL" \
  grant create \
  --from-json file:///tmp/dbtools-mcp-role-grant.json
Add IAM Policy
Create a network source for the private subnet. The IAM policy uses this network source to scope MCP invocation to this private network path.
export DBTOOLS_MCP_NETWORK_SOURCE_NAME="$(printf '%s_private_subnet' "$DEPLOYMENT_PREFIX" | tr '-' '_')"

cat > /tmp/dbtools-mcp-network-source-virtual.json <<EOF
[
  {
    "vcnId": "${VCN_OCID}",
    "ipRanges": ["${PRIVATE_SUBNET_CIDR}"]
  }
]
EOF

oci iam network-sources create \
  --compartment-id "$TENANCY_OCID" \
  --name "$DBTOOLS_MCP_NETWORK_SOURCE_NAME" \
  --description "Private subnet allowed to invoke Database Tools MCP Server" \
  --virtual-source-list file:///tmp/dbtools-mcp-network-source-virtual.json
Create the IAM policy:
export MCP_USERS_GROUP_NAME="MCP_All_Users"

export IDENTITY_DOMAIN_DISPLAY_NAME="$(
  oci iam domain get \
    --domain-id "$IDENTITY_DOMAIN_OCID" \
    --query 'data."display-name"' \
    --raw-output
)"

cat > /tmp/dbtools-mcp-policy-statements.json <<EOF
[
  "allow group '${IDENTITY_DOMAIN_DISPLAY_NAME}'/'${MCP_USERS_GROUP_NAME}' to use database-tools-mcp-servers-invocation in compartment id ${COMPARTMENT_OCID} where request.networkSource.name = '${DBTOOLS_MCP_NETWORK_SOURCE_NAME}'",
  "allow any-user to use database-tools-connections in compartment id ${COMPARTMENT_OCID} where request.principal.id = '${DBTOOLS_MCP_SERVER_OCID}'",
  "allow any-user to read secret-bundles in compartment id ${COMPARTMENT_OCID} where request.principal.id = '${DBTOOLS_MCP_SERVER_OCID}'"
]
EOF

oci iam policy create \
  --compartment-id "$COMPARTMENT_OCID" \
  --name "${DEPLOYMENT_PREFIX}-dbtools-mcp-policy" \
  --description "Policies for Database Tools MCP Server" \
  --statements file:///tmp/dbtools-mcp-policy-statements.json \
  --wait-for-state ACTIVE
The invocation policy above is intentionally scoped to the private subnet network source. If you validate from a laptop or workstation that is not seen by OCI as coming from that network source, invocation can fail even when the MCP Server and OAuth setup are correct. For local validation, run the client from an allowed network path or adjust the invocation policy for your test source, then tighten it again after validation.
Validate with Codex and mcp-remote
Validate the MCP Server with a real client before building anything on top of it. This example uses the Codex IDE Extension or Codex CLI with mcp-remote and a registered OAuth client for local development.
Create or reuse a public OAuth client in the identity domain and attach it to the Database Tools MCP Server. This local Codex validation client does not use a client secret. Add a loopback redirect URI to the client. The port must match the port you pass to mcp-remote in the Codex config.
http://localhost:9876/oauth/callbackCapture the OAuth client ID:
export DBTOOLS_MCP_CLIENT_ID="<oauth-client-id>"Codex stores MCP configuration in ~/.codex/config.toml. The Codex CLI and Codex IDE Extension share this file. In the IDE Extension, you can open it from MCP settings > Open config.toml.
Install or allow npx to fetch mcp-remote. If npx waits for an install prompt during Codex startup, Codex can report an MCP startup timeout.
Add this MCP server entry:
[mcp_servers.dbtools-mcp-server]
enabled = true
command = "npx"
startup_timeout_sec = 60
type = "stdio"
args = [
  "-y",
  "mcp-remote",
  "<DBTOOLS_MCP_ENDPOINT>",
  "9876",
  "--transport",
  "http-only",
  "--static-oauth-client-metadata",
  "{ \"scope\": \"<DBTOOLS_MCP_SCOPE> offline_access\" }",
  "--static-oauth-client-info",
  "{ \"client_id\": \"<DBTOOLS_MCP_CLIENT_ID>\" }"
]
Replace the placeholders with the values from this post:
<DBTOOLS_MCP_ENDPOINT>          -> ${DBTOOLS_MCP_ENDPOINT}
<DBTOOLS_MCP_SCOPE>             -> ${DBTOOLS_MCP_SCOPE}
<DBTOOLS_MCP_CLIENT_ID>         -> OAuth client ID registered for mcp-remote
Restart Codex after saving the file. On first use, mcp-remote opens the OAuth authorization flow in your browser and listens on the local callback port. The callback URL uses http://localhost because it is a loopback-only OAuth callback on your machine. The MCP invoke endpoint and token exchange still use HTTPS.
After consent, mcp-remote stores the resulting token under ~/.mcp-auth/. Expect the first run to be slower than later starts: it may install mcp-remote, open the browser, wait for OAuth consent, and write the token cache.
In Codex, ask it to list the tools on the dbtools-mcp-server MCP server. The available tools should include the toolset entries created earlier, such as:
schema_informationsql_runrequest_status
Then test a metadata-only request first, for example:
Use the dbtools-mcp-server tools to show what schemas or tables are visible.Startup timeout usually means the local client never finished its setup path. Run the same npx -y mcp-remote ... command from a terminal first so install prompts, browser/OAuth issues, proxy problems, and network-policy denials are visible outside Codex. If authorization fails after startup, check the registered redirect URI and port, the client ID in config.toml, the MCP scope, the user’s MCP app role, and the IAM policy for database-tools-mcp-servers-invocation.
Important Values
Keep these handoff values:
printf '%s\n' \
  "DBTOOLS_CONNECTION_OCID=${DBTOOLS_CONNECTION_OCID}" \
  "DBTOOLS_MCP_SERVER_OCID=${DBTOOLS_MCP_SERVER_OCID}" \
  "DBTOOLS_MCP_ENDPOINT=${DBTOOLS_MCP_ENDPOINT}" \
  "DBTOOLS_MCP_TOOLSET_OCID=${DBTOOLS_MCP_TOOLSET_OCID}" \
  "DBTOOLS_MCP_DOMAIN_APP_ID=${DBTOOLS_MCP_DOMAIN_APP_ID}" \
  "DBTOOLS_MCP_SCOPE=${DBTOOLS_MCP_SCOPE}" \
  "IDENTITY_DOMAIN_OCID=${IDENTITY_DOMAIN_OCID}" \
  "IDENTITY_DOMAIN_URL=${IDENTITY_DOMAIN_URL}" \
  "VCN_OCID=${VCN_OCID}" \
  "PRIVATE_SUBNET_OCID=${PRIVATE_SUBNET_OCID}" \
  "PRIVATE_SUBNET_CIDR=${PRIVATE_SUBNET_CIDR}" \
  "PRIVATE_ROUTE_TABLE_OCID=${PRIVATE_ROUTE_TABLE_OCID}" \
  "PRIVATE_SECURITY_LIST_OCID=${PRIVATE_SECURITY_LIST_OCID}" \
  "ADB_OCID=${ADB_OCID}"