OCI Database Tools is useful when you want a managed SQL access path to an Oracle Database without opening the database to the public internet. IAM authentication makes that path more interesting: instead of distributing a database password to every developer, you can let OCI issue the database token and map that identity to a global database user.
This post walks through a practical setup:
- An Autonomous Database with public access disabled.
- A Database Tools private endpoint in the same network path as the database.
- A privileged setup connection that uses the
ADMINpassword from OCI Vault. - A token-based Database Tools connection that authenticates with OCI IAM.
- A final SQL check that shows which database identity was used.
The official documentation shows the Console flow for integrating IAM authentication with Database Tools. The goal here is to keep the same shape, but make the flow repeatable with the OCI CLI.
Use Case
Assume a bank runs an internal payments platform backed by a private Autonomous Database. The database contains batch status, payment events, settlement references, and operational audit data. During an incident, the production support team may need read-only SQL access to verify whether a payment batch finished or inspect recent event records.
The platform team does not want to share the ADMIN password, create long-lived database passwords for every support engineer, or open database network access from engineer laptops.
The desired model is:
- Database network access stays private.
- Database credentials stay in OCI Vault.
- Support engineers authenticate with their OCI identity.
- IAM policy controls which support group can use the Database Tools connection.
- The database still decides what the mapped user can do.
This is not a replacement for database privileges. IAM gets the user to the door; the global database user and grants decide what happens after that.
Architecture
At a high level, the request path looks like this:
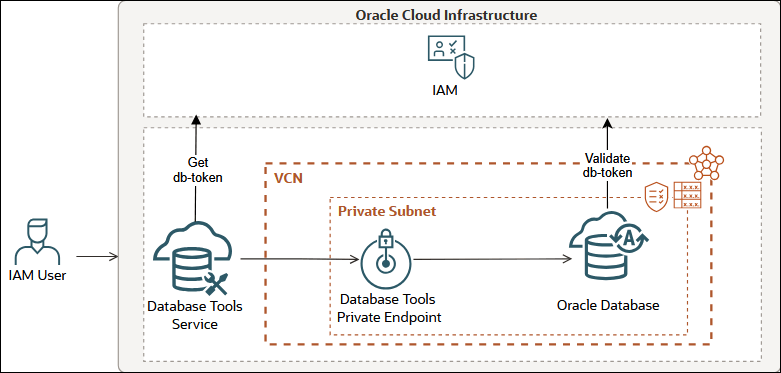
The setup uses two Database Tools connections:
-
adb-support-admin-setupA temporary password-authenticated connection used to create the global database user and enable external authentication. -
adb-prod-support-readonlyThe connection the support team actually uses. It uses token authentication and maps an OCI IAM group to a read-only database user.
Prerequisites
This walkthrough assumes the following already exist:
- OCI CLI configured for the tenancy and region.
- An Autonomous Database.
- Public access disabled for the Autonomous Database.
- A VCN with a private subnet.
- A Database Tools private endpoint created in that subnet.
- OCI Vault with an encryption key.
- A Vault secret containing the
ADMINdatabase password. - A Vault secret containing the Autonomous Database regional wallet.
- Network security rules that allow the private endpoint path to reach the database.
- Permission to create or use the IAM group for support engineers.
- Permission to create or update the IAM policy for that group, or an existing policy that grants equivalent access.
You also need jq installed locally. The examples use it to build JSON safely instead of relying on fragile shell quoting.
Variables
Replace these values for your environment:
export OCI_CLI_PROFILE="<oci-profile>"
export OCI_CLI_REGION="<oci-region>"
export OCI_CLI_AUTH="<cli-auth>"

export TENANCY_OCID="ocid1.tenancy.oc1..example"
export COMPARTMENT_OCID="ocid1.compartment.oc1..example"
export DATABASE_COMPARTMENT_NAME="MyComp"
export ADBS_OCID="ocid1.autonomousdatabase.oc1..example"
export ADMIN_DB_PASSWORD_SECRET_OCID="ocid1.vaultsecret.oc1..admin-password"
export REGIONAL_WALLET_SECRET_OCID="ocid1.vaultsecret.oc1..regional-wallet"
export PRIVATE_ENDPOINT_ID="ocid1.databasetoolsprivateendpoint.oc1..example"

export DB_TOKEN_SCOPE="urn:oracle:db::id::$COMPARTMENT_OCID::$ADBS_OCID"
export IAM_GROUP_NAME="prod-db-support-readonly"
export IAM_GROUP_DESCRIPTION="Production support engineers who can use Database Tools IAM token connections"
export SUPPORT_USER_OCID="ocid1.user.oc1..example"
export IAM_POLICY_NAME="prod-support-database-tools-token-access"
export IAM_DB_USER="PROD_SUPPORT_RO"
export ADMIN_CONNECTION_NAME="adb-support-admin-setup"
export IAM_CONNECTION_NAME="adb-prod-support-readonly"

export DB_CONNECT_STRING='(description=(retry_count=3)(retry_delay=3)(address=(protocol=tcps)(port=1522)(host=aaabbccc.adb.us-ashburn-1.oraclecloud.com))(connect_data=(service_name=orders_low.adb.oraclecloud.com))(security=(ssl_server_dn_match=yes)))'
The OCI_CLI_PROFILE, OCI_CLI_REGION, and OCI_CLI_AUTH exports let the examples use the same CLI profile, region, and authentication mode without repeating flags on every command.
For OCI_CLI_AUTH, use the authentication mode that matches your environment. The OCI CLI supports values such as api_key, security_token, instance_principal, instance_obo_user, resource_principal, and oke_workload_identity.
For OCI_CLI_REGION, use a valid OCI region identifier. You can list regions with:
oci iam region listThe DB_TOKEN_SCOPE value is the database token scope expected by the database IAM authentication setup. For this walkthrough, the IAM policy is restricted to one database with target.database.id, so use the database compartment OCID and database OCID in this form:
urn:oracle:db::id::<compartment-ocid>::<database-ocid>Step 1: Create the IAM Group
Create the IAM group for the support engineers, or reuse an existing group if your organization already manages one. OCI IAM groups are created in the tenancy, which is the root compartment.
export IAM_GROUP_ID="$(
  oci iam group list \
    --compartment-id "$TENANCY_OCID" \
    --name "$IAM_GROUP_NAME" \
    --lifecycle-state ACTIVE \
    --all \
    --query "data[0].id" \
    --raw-output
)"

if [ -z "$IAM_GROUP_ID" ] || [ "$IAM_GROUP_ID" = "null" ]; then
  export IAM_GROUP_ID="$(
    oci iam group create \
      --compartment-id "$TENANCY_OCID" \
      --name "$IAM_GROUP_NAME" \
      --description "$IAM_GROUP_DESCRIPTION" \
      --wait-for-state ACTIVE \
      --query "data.id" \
      --raw-output
  )"
fi
Confirm the group ID:
echo "$IAM_GROUP_ID"Add the support engineers who should use this connection to the group. Run this once for each support user OCID:
oci iam group add-user \
  --group-id "$IAM_GROUP_ID" \
  --user-id "$SUPPORT_USER_OCID"
Confirm the group membership:
oci iam group list-users \
  --group-id "$IAM_GROUP_ID" \
  --query "data[].{name:name,id:id}" \
  --output table
If your tenancy uses identity domains or an external identity provider, create or map the group through that identity system and use the resulting OCI group name in the policy.
Step 2: Create the IAM Policy
Create an IAM policy that lets the intended group use Database Tools connections for the target database.
For a public example, prefer a group-based policy:
allow group prod-db-support-readonly to use database-connections in compartment MyComp
  where target.database.id = '<ADBS_OCID>'
For quick testing you may see examples using any-user, but that is broader than most production setups need:
allow any-user to use database-connections in compartment MyComp
  where target.database.id = '<ADBS_OCID>'
Use the narrower policy unless you have a specific reason not to.
If an administrator already created an equivalent policy, skip this command. Otherwise, create the policy in the root compartment by passing the tenancy OCID to --compartment-id. The policy statement still scopes access to the database compartment:
export SUPPORT_POLICY_STATEMENTS="$(
  jq -nc \
    --arg groupName "$IAM_GROUP_NAME" \
    --arg compartmentName "$DATABASE_COMPARTMENT_NAME" \
    --arg databaseId "$ADBS_OCID" \
    '[("allow group " + $groupName + " to use database-connections in compartment " + $compartmentName + " where target.database.id = \u0027" + $databaseId + "\u0027")]'
)"

export IAM_POLICY_ID="$(
  oci iam policy create \
    --compartment-id "$TENANCY_OCID" \
    --name "$IAM_POLICY_NAME" \
    --description "Allow production support engineers to use Database Tools IAM token connections for the target database" \
    --statements "$SUPPORT_POLICY_STATEMENTS" \
    --wait-for-state ACTIVE \
    --query "data.id" \
    --raw-output
)"
Before validating the IAM-authenticated connection, also check the IAM user’s Database Username setting in the OCI Console under User > Saved Password > Database Username. For the shared group mapping used in this post, the value should match PROD_SUPPORT_RO for users who belong to prod-db-support-readonly. If you use an exclusive mapping with IAM_PRINCIPAL_NAME, the value must match the IAM user name in that global user mapping. If this value is not set, OCI uses the IAM user’s standard user name as the fallback, which can make validation fail even when the Database Tools connection is otherwise configured correctly.
Step 3: Create the Admin Setup Connection
The first connection uses password authentication with a privileged database user. For Autonomous Database, that is commonly ADMIN. This connection is only for setup.
Build the JSON arguments first:
export KEY_STORES_JSON="$(
  jq -nc \
    --arg walletSecretId "$REGIONAL_WALLET_SECRET_OCID" \
    '[{
      keyStoreType: "SSO",
      keyStoreContent: {
        valueType: "SECRETID",
        secretId: $walletSecretId
      },
      keyStorePassword: null
    }]'
)"

export RELATED_RESOURCE_JSON="$(
  jq -nc \
    --arg adbId "$ADBS_OCID" \
    '{
      entityType: "AUTONOMOUSDATABASE",
      identifier: $adbId
    }'
)"
Create the connection:
export ADMIN_CONNECTION_ID="$(
  oci dbtools connection create-oracle-database \
    --compartment-id "$COMPARTMENT_OCID" \
    --display-name "$ADMIN_CONNECTION_NAME" \
    --connection-string "$DB_CONNECT_STRING" \
    --user-name "ADMIN" \
    --authentication-type PASSWORD \
    --user-password-secret-id "$ADMIN_DB_PASSWORD_SECRET_OCID" \
    --private-endpoint-id "$PRIVATE_ENDPOINT_ID" \
    --key-stores "$KEY_STORES_JSON" \
    --runtime-support SUPPORTED \
    --runtime-identity AUTHENTICATED_PRINCIPAL \
    --related-resource "$RELATED_RESOURCE_JSON" \
    --wait-for-state SUCCEEDED \
    --query 'data.resources[?"entity-type" == `databasetoolsconnection`].identifier | [0]' \
    --raw-output
)"
Confirm the variable was populated:
echo "$ADMIN_CONNECTION_ID"Step 4: Create the Global Database User
Create a database user that maps to the IAM group.
export CREATE_IAM_USER_SQL="$(
  jq -nc \
    --arg dbUser "$IAM_DB_USER" \
    --arg iamGroup "$IAM_GROUP_NAME" \
    '{
      type: "STANDARD",
      statementText:
        ("CREATE USER " + $dbUser + " IDENTIFIED GLOBALLY AS '\''IAM_GROUP_NAME=" + $iamGroup + "'\''; GRANT CREATE SESSION TO " + $dbUser + ";")
    }'
)"

oci dbtools-runtime connection execute-sql sync \
  --connection-id "$ADMIN_CONNECTION_ID" \
  --request-input "$CREATE_IAM_USER_SQL"
For a real read-only support use case, grant only the specific objects the support team needs. For example:
GRANT SELECT ON app_owner.payment_batch TO PROD_SUPPORT_RO;
GRANT SELECT ON app_owner.payment_event TO PROD_SUPPORT_RO;
Avoid granting broad roles such as SELECT_CATALOG_ROLE unless the support process explicitly requires it.
Step 5: Enable External Authentication
Enable OCI IAM as the external authentication provider for the database connection.
oci dbtools-runtime property-set update oracle-database-external-authentication-details \
  --connection-id "$ADMIN_CONNECTION_ID" \
  --property-set-key ORACLE_DATABASE_EXTERNAL_AUTHENTICATION \
  --identity-provider '{"type":"OCI_IAM"}' \
  --force
At this point the database has a global user mapping, and the Database Tools connection has external authentication enabled.
Step 6: Create the IAM Authenticated Connection
Now create the connection that uses IAM token authentication.
For TOKEN authentication, do not pass a database --user-name. The database user is resolved from the IAM database token and the database IAM mapping. In this example, that authenticated database identity must resolve to PROD_SUPPORT_RO.
export ADVANCED_PROPERTIES_JSON="$(
  jq -nc \
    --arg tokenScope "$DB_TOKEN_SCOPE" \
    '{ "iam.db.token.scope": $tokenScope }'
)"

export IAM_USER_CONNECTION_ID="$(
  oci dbtools connection create-oracle-database \
    --compartment-id "$COMPARTMENT_OCID" \
    --display-name "$IAM_CONNECTION_NAME" \
    --connection-string "$DB_CONNECT_STRING" \
    --authentication-type TOKEN \
    --private-endpoint-id "$PRIVATE_ENDPOINT_ID" \
    --key-stores "$KEY_STORES_JSON" \
    --advanced-properties "$ADVANCED_PROPERTIES_JSON" \
    --runtime-support SUPPORTED \
    --runtime-identity AUTHENTICATED_PRINCIPAL \
    --related-resource "$RELATED_RESOURCE_JSON" \
    --wait-for-state SUCCEEDED \
    --query 'data.resources[?"entity-type" == `databasetoolsconnection`].identifier | [0]' \
    --raw-output
)"
Confirm the connection ID:
echo "$IAM_USER_CONNECTION_ID"Step 7: Validate the IAM Connection
Validate the connection before running SQL:
For this demo, make sure the OCI user running the validation is a member of the IAM group used in the database mapping, prod-db-support-readonly, and that this group is covered by the IAM policy from Step 2. Otherwise the token connection can validate the network and wallet path but still fail the IAM-to-database user mapping.
oci dbtools-runtime connection validate oracle-database \
  --connection-id "$IAM_USER_CONNECTION_ID"
A healthy response should indicate that the connection is correctly configured. It should also show OCI IAM external authentication as enabled.
Step 8: Run a SQL Check
Run a simple identity query:
export IDENTITY_CHECK_SQL="$(
  jq -nc '{
    type: "STANDARD",
    statementText:
      "select sys_context('\''userenv'\'', '\''current_schema'\'') as current_schema, sys_context('\''userenv'\'', '\''session_user'\'') as session_user, sys_context('\''userenv'\'', '\''authenticated_identity'\'') as authenticated_identity, sys_context('\''userenv'\'', '\''authentication_method'\'') as authentication_method from dual"
  }'
)"

oci dbtools-runtime connection execute-sql sync \
  --connection-id "$IAM_USER_CONNECTION_ID" \
  --request-input "$IDENTITY_CHECK_SQL"
For an IAM group mapping, expect the output to show:
session_useras the global database user you created.authenticated_identityas the IAM-authenticated identity.authentication_methodas a token-based global authentication method.
The exact field names and casing depend on the database version and Database Tools runtime response shape, but this query is useful because it verifies the end-to-end identity path rather than only checking that the TCP connection works.
Troubleshooting
If validation fails, use the official Database Tools troubleshooting guide: https://docs.oracle.com/en-us/iaas/database-tools/doc/troubleshooting.html#GUID-167E8A13-F2B4-43B9-84B2-FE50F6DBEC90.
Cleanup
After testing, remove temporary resources that are no longer needed.
Delete the IAM-authenticated Database Tools connection:
oci dbtools connection delete \
  --connection-id "$IAM_USER_CONNECTION_ID" \
  --force
If this was only a test, remove the database user while the admin setup connection still exists:
export DROP_IAM_USER_SQL="$(
  jq -nc \
    --arg dbUser "$IAM_DB_USER" \
    '{
      type: "STANDARD",
      statementText: ("DROP USER " + $dbUser)
    }'
)"

oci dbtools-runtime connection execute-sql sync \
  --connection-id "$ADMIN_CONNECTION_ID" \
  --request-input "$DROP_IAM_USER_SQL"
Then delete the admin setup connection:
oci dbtools connection delete \
  --connection-id "$ADMIN_CONNECTION_ID" \
  --force
If you created the IAM policy for this post and no longer need it, delete it from the root compartment:
export IAM_POLICY_ID="$(
  oci iam policy list \
    --compartment-id "$TENANCY_OCID" \
    --name "$IAM_POLICY_NAME" \
    --lifecycle-state ACTIVE \
    --all \
    --query "data[0].id" \
    --raw-output
)"

if [ -n "$IAM_POLICY_ID" ] && [ "$IAM_POLICY_ID" != "null" ]; then
  oci iam policy delete \
    --policy-id "$IAM_POLICY_ID" \
    --force \
    --wait-for-state DELETED
fi
If you added a test support user to the IAM group for this post, remove that user from the group:
oci iam group remove-user \
  --compartment-id "$TENANCY_OCID" \
  --group-id "$IAM_GROUP_ID" \
  --user-id "$SUPPORT_USER_OCID" \
  --force
If you created the IAM group only for this test and it has no remaining users, delete it:
oci iam group delete \
  --group-id "$IAM_GROUP_ID" \
  --force \
  --wait-for-state DELETED
If the private endpoint, Vault, or network resources are shared, do not delete them as part of this cleanup.
References
- Integrating IAM Authentication with Database Tools
- OCI CLI Command Reference
- OCI CLI
iam region list - Use IAM Authentication with Autonomous Database
- Working with IAM Database User Names and Passwords
- Managing Users
Closing Thoughts
The useful part of this setup is separation of concerns:
- OCI IAM controls who can use the Database Tools connection.
- The private endpoint controls the network path.
- OCI Vault keeps database secrets out of local scripts.
- The database global user and grants control what the authenticated user can do.
That gives you a cleaner operational model than sharing database passwords, especially for private databases where you already want access to flow through managed OCI services.