Oracle Deep Data Security keeps authorization in the database. With OCI Database Tools, the connection stays the same while the database decides what each caller can see.
For background, see Oracle’s Introduction to Deep Data Security.
This post builds on IAM authentication with Database Tools connections and managed Database Tools MCP Server setup. The database-specific pieces are:
- No
CREATE USER ... IDENTIFIED GLOBALLY ASstep. - A Deep Data Security data role mapped to an existing identity-domain group.
- A database role that provides
CREATE SESSION. - Data grants that enforce row, column, and cell access.
- The same Database Tools connection can then be reused by SQL tools and a managed MCP Server.
Use Case
Consider an internal loan review app with two roles:
- A loan officer handles intake and follows up on assigned applications.
- An underwriter reviews applications that are ready for risk review.
The loan officer sees assigned applications. The underwriter sees the underwriting queue, without sensitive fields such as customer SSN. The app asks for data; the database enforces the result.
Identity-Aware Token Exchange
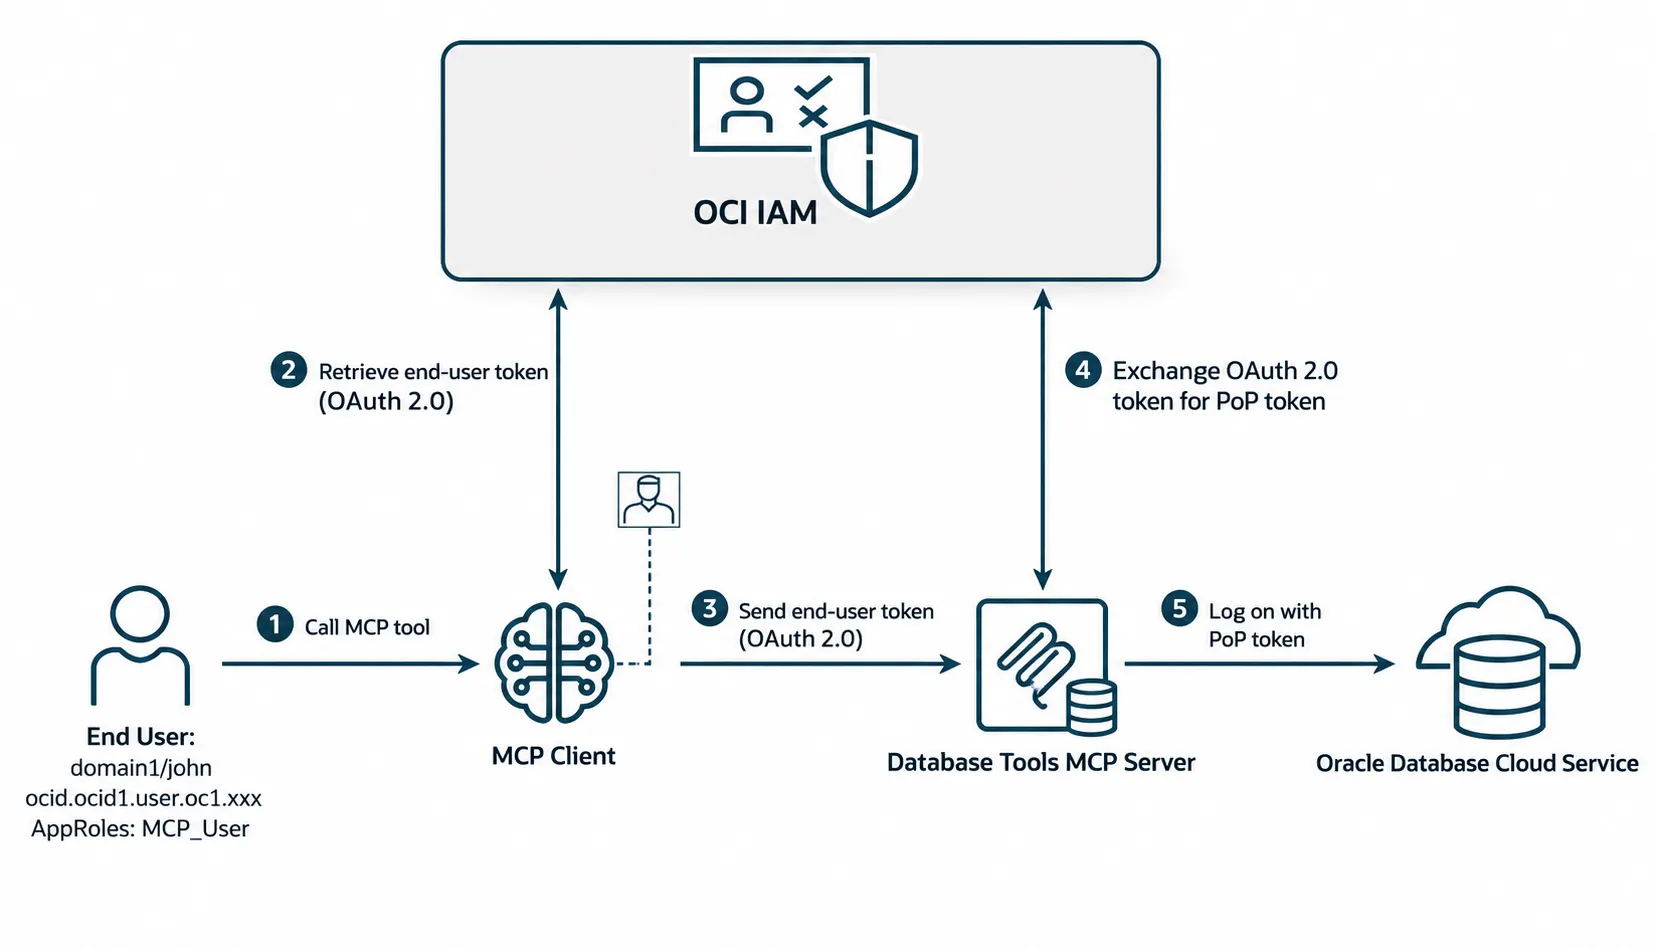
The signed-in user authenticates to the MCP client with OAuth 2.0. The client passes that end-user token to the managed MCP Server, which exchanges it for a proof-of-possession (PoP) token to connect to the database. The database can then evaluate the caller’s identity and apply the mapped data role and data grants, instead of treating every MCP request as one shared database account.
Prerequisites
You need:
- OCI CLI configured for your tenancy and region.
- Autonomous Database with a private endpoint and Oracle AI Database 26ai April Release Update.
- An OCI Vault secret for the database password and a regional wallet or
cwallet.sso. - A Database Tools private endpoint that can reach the database private endpoint.
- A tenancy administrator, or permissions to create Database Tools connections and MCP resources, access the Vault secrets, and create the IAM policy.
- An existing identity domain and an existing user in that domain.
- Permission to run the required database DDL as a privileged user.
Variables
Replace these values for your environment:
export OCI_CLI_PROFILE="<admin-oci-profile>"
export OCI_CLI_REGION="<oci-region>"
export OCI_CLI_AUTH="<admin-cli-auth>"

export TENANCY_OCID="ocid1.tenancy.oc1..example"
export COMPARTMENT_OCID="ocid1.compartment.oc1..example"
export ADBS_OCID="ocid1.autonomousdatabase.oc1..example"
export ADMIN_DB_PASSWORD_SECRET_OCID="ocid1.vaultsecret.oc1..admin-password"
export REGIONAL_WALLET_SECRET_OCID="ocid1.vaultsecret.oc1..regional-wallet"
export PRIVATE_ENDPOINT_ID="ocid1.databasetoolsprivateendpoint.oc1..example"
export IDENTITY_DOMAIN_OCID="ocid1.identitydomain.oc1..example"
export IDENTITY_DOMAIN_DISPLAY_NAME="<identity-domain-display-name>"

export DB_TOKEN_SCOPE="urn:oracle:db::id::$COMPARTMENT_OCID::$ADBS_OCID"
export IDENTITY_DOMAIN_USER_NAME="<existing-identity-domain-user-name-or-email>"
export MCP_USERS_GROUP_NAME="<existing-identity-domain-group-name>"
export IAM_POLICY_NAME="deepsec-database-tools-mcp-access"
export DEPLOYMENT_PREFIX="deepsec"
export ADMIN_CONNECTION_NAME="deepsec-admin-setup"
export DEEPSEC_CONNECTION_NAME="deepsec-token-connection"
export DB_CONNECT_STRING='(description=(retry_count=3)(retry_delay=3)(address=(protocol=tcps)(port=1522)(host=aaabbccc.adb.us-ashburn-1.oraclecloud.com))(connect_data=(service_name=orders_low.adb.oraclecloud.com))(security=(ssl_server_dn_match=yes)))'
Use the administrator profile for setup, MCP provisioning, OAuth role assignment, and policy creation. The final Codex validation signs in as the existing identity-domain user.
Step 1: Create The Admin Setup Connection
Use this password-authenticated connection only for database setup.
export KEY_STORES_JSON="$(
  jq -nc \
    --arg walletSecretId "$REGIONAL_WALLET_SECRET_OCID" \
    '[{
      keyStoreType: "SSO",
      keyStoreContent: {
        valueType: "SECRETID",
        secretId: $walletSecretId
      },
      keyStorePassword: null
    }]'
)"

export RELATED_RESOURCE_JSON="$(
  jq -nc \
    --arg adbId "$ADBS_OCID" \
    '{
      entityType: "AUTONOMOUSDATABASE",
      identifier: $adbId
    }'
)"
export ADMIN_CONNECTION_ID="$(
oci dbtools connection create-oracle-database \
--compartment-id "$COMPARTMENT_OCID" \
--display-name "$ADMIN_CONNECTION_NAME" \
--connection-string "$DB_CONNECT_STRING" \
--user-name "ADMIN" \
--authentication-type PASSWORD \
--user-password-secret-id "$ADMIN_DB_PASSWORD_SECRET_OCID" \
--private-endpoint-id "$PRIVATE_ENDPOINT_ID" \
--key-stores "$KEY_STORES_JSON" \
--runtime-support SUPPORTED \
--runtime-identity AUTHENTICATED_PRINCIPAL \
--related-resource "$RELATED_RESOURCE_JSON" \
--wait-for-state SUCCEEDED \
--query 'data.resources[?"entity-type" == `databasetoolsconnection`].identifier | [0]' \
--raw-output
)"Step 2: Create The Lending Schema And Seed Data
The sample schema uses one table, lending.loan_applications, to demonstrate row filtering and hidden columns.
Run it through the admin connection:
export LENDING_SCHEMA_SQL="$(
  jq -nc \
    --rawfile sql ./deep-data-security-lending-schema.sql \
    '{ type: "STANDARD", statementText: $sql }'
)"

oci dbtools-runtime connection execute-sql sync \
  --connection-id "$ADMIN_CONNECTION_ID" \
  --request-input "$LENDING_SCHEMA_SQL"
The downloaded SQL file seeds three fictional applications. loan.officer1 and loan.officer2 are values in the assigned_officer column; the script does not create database users or identity-domain users with those names.
Before running the script, choose an existing identity-domain user to test with and set IDENTITY_DOMAIN_USER_NAME to that user’s exact userName. To use the sample data unchanged, that user must have the username loan.officer1. Otherwise, update the assigned_officer values in the three INSERT statements in deep-data-security-lending-schema.sql to match your test user’s identity-domain username. The value must exactly match the username returned by ORA_END_USER_CONTEXT.username.
The third sample application is assigned to loan.officer2 and is outside the underwriting queue, so a user signed in as loan.officer1 cannot see it.
Step 3: Create The Deep Data Security Mappings
Create a mapped data role instead of a global database user. Its database role provides CREATE SESSION.
CREATE DATA ROLE mcp_administrator_role MAPPED TO 'IAM_GROUP_NAME=${IDENTITY_DOMAIN_DISPLAY_NAME}/${MCP_USERS_GROUP_NAME}';
CREATE ROLE oci_connect_role;
GRANT CREATE SESSION TO oci_connect_role;
GRANT oci_connect_role TO mcp_administrator_role;
Run it through the admin connection:
export CREATE_DSS_SQL="$(
  jq -nc \
    --arg identityDomainDisplayName "$IDENTITY_DOMAIN_DISPLAY_NAME" \
    --arg groupName "$MCP_USERS_GROUP_NAME" \
    '{
      type: "STANDARD",
      statementText:
        ("CREATE DATA ROLE mcp_administrator_role MAPPED TO '\''IAM_GROUP_NAME=" + $identityDomainDisplayName + "/" + $groupName + "'\''; " +
         "CREATE ROLE oci_connect_role; " +
         "GRANT CREATE SESSION TO oci_connect_role; " +
         "GRANT oci_connect_role TO mcp_administrator_role;")
    }'
)"

oci dbtools-runtime connection execute-sql sync \
  --connection-id "$ADMIN_CONNECTION_ID" \
  --request-input "$CREATE_DSS_SQL"
Add the data grants:
CREATE DATA GRANT lending.loan_officer_applications
  AS SELECT
  ON lending.loan_applications
  WHERE assigned_officer = ORA_END_USER_CONTEXT.username
  TO mcp_administrator_role;
CREATE DATA GRANT lending.underwriter_applications
AS SELECT (ALL COLUMNS EXCEPT customer_ssn)
ON lending.loan_applications
WHERE in_underwriting_queue = 'Y'
TO mcp_administrator_role;Execute both grants:
export DATA_GRANTS_SQL="$(
  jq -n '{
    type: "STANDARD",
    statementText:
      "CREATE DATA GRANT lending.loan_officer_applications AS SELECT ON lending.loan_applications WHERE assigned_officer = ORA_END_USER_CONTEXT.username TO mcp_administrator_role; " +
      "CREATE DATA GRANT lending.underwriter_applications AS SELECT (ALL COLUMNS EXCEPT customer_ssn) ON lending.loan_applications WHERE in_underwriting_queue = \u0027Y\u0027 TO mcp_administrator_role;"
  }'
)"

oci dbtools-runtime connection execute-sql sync \
  --connection-id "$ADMIN_CONNECTION_ID" \
  --request-input "$DATA_GRANTS_SQL"
Step 4: Enable OCI IAM External Authentication
Enable OCI IAM as the external authentication provider for the connection.
oci dbtools-runtime property-set update oracle-database-external-authentication-details \
  --connection-id "$ADMIN_CONNECTION_ID" \
  --property-set-key ORACLE_DATABASE_EXTERNAL_AUTHENTICATION \
  --identity-provider '{"type":"OCI_IAM"}' \
  --force
Step 5: Create The Token-Based Connection
Create the IAM token-authenticated connection for the MCP Server.
export ADVANCED_PROPERTIES_JSON="$(
  jq -nc \
    --arg tokenScope "$DB_TOKEN_SCOPE" \
    '{ "iam.db.token.scope": $tokenScope }'
)"

export DEEPSEC_CONNECTION_ID="$(
  oci dbtools connection create-oracle-database \
    --compartment-id "$COMPARTMENT_OCID" \
    --display-name "$DEEPSEC_CONNECTION_NAME" \
    --connection-string "$DB_CONNECT_STRING" \
    --authentication-type TOKEN \
    --private-endpoint-id "$PRIVATE_ENDPOINT_ID" \
    --key-stores "$KEY_STORES_JSON" \
    --advanced-properties "$ADVANCED_PROPERTIES_JSON" \
    --runtime-support SUPPORTED \
    --runtime-identity AUTHENTICATED_PRINCIPAL \
    --related-resource "$RELATED_RESOURCE_JSON" \
    --wait-for-state SUCCEEDED \
    --query 'data.resources[?"entity-type" == `databasetoolsconnection`].identifier | [0]' \
    --raw-output
)"
Step 6: Create The MCP Server Using The Token-Based Connection
Create the managed MCP Server using the token-authenticated Database Tools connection from Step 5 (DEEPSEC_CONNECTION_ID). This is the connection that obtains a token for the signed-in identity-domain user; it is not the ADMIN_CONNECTION_ID used to create the schema and data grants.
oci dbtools mcp-server create-mcp-server-default \
  --compartment-id "$COMPARTMENT_OCID" \
  --display-name "${DEPLOYMENT_PREFIX}-mcp-server" \
  --description "Managed Database Tools MCP Server backed by Deep Data Security" \
  --connection-id "$DEEPSEC_CONNECTION_ID" \
  --domain-id "$IDENTITY_DOMAIN_OCID" \
  --runtime-identity AUTHENTICATED_PRINCIPAL \
  --storage '{"type":"NONE"}' \
  --wait-for-state SUCCEEDED \
  --wait-for-state FAILED \
  --max-wait-seconds 1800

export DBTOOLS_MCP_SERVER_OCID="$(
  oci dbtools mcp-server list \
    --compartment-id "$COMPARTMENT_OCID" \
    --display-name "${DEPLOYMENT_PREFIX}-mcp-server" \
    --database-tools-connection-id "$DEEPSEC_CONNECTION_ID" \
    --lifecycle-state ACTIVE \
    --all \
    --query 'data.items[0].id' \
    --raw-output
)"

export DBTOOLS_MCP_DOMAIN_APP_ID="$(
  oci dbtools mcp-server get \
    --mcp-server-id "$DBTOOLS_MCP_SERVER_OCID" \
    --query 'data."domain-app-id"' \
    --raw-output
)"

export DBTOOLS_MCP_ENDPOINT="$(
  oci dbtools mcp-server get \
    --mcp-server-id "$DBTOOLS_MCP_SERVER_OCID" \
    --query 'data.endpoints[0].endpoint' \
    --raw-output
)"
Add the built-in SQL toolset:
export DBTOOLS_MCP_TOOLSET_VERSION="4"

cat > /tmp/dbtools-mcp-tools.json <<'JSON'
[
  {
    "name": "sql_run",
    "status": "ENABLED",
    "allowedRoles": ["MCP_Operator", "MCP_Administrator"]
  },
  {
    "name": "schema_information",
    "status": "ENABLED",
    "allowedRoles": ["MCP_User", "MCP_Operator", "MCP_Administrator"]
  }
]
JSON

oci dbtools mcp-toolset create-mcp-toolset-built-in-sql-tools \
  --compartment-id "$COMPARTMENT_OCID" \
  --display-name "${DEPLOYMENT_PREFIX}-built-in-sql-tools" \
  --description "Built-in SQL tools for Deep Data Security demo" \
  --mcp-server-id "$DBTOOLS_MCP_SERVER_OCID" \
  --toolset-version "$DBTOOLS_MCP_TOOLSET_VERSION" \
  --default-execution-type SYNCHRONOUS \
  --tools file:///tmp/dbtools-mcp-tools.json \
  --wait-for-state SUCCEEDED \
  --wait-for-state FAILED \
  --max-wait-seconds 1800
Step 7: Configure OAuth And Roles
Reuse or create an OAuth client in the existing identity domain, then attach it in Developer Services > Database Tools > MCP Servers > ${DEPLOYMENT_PREFIX}-mcp-server. Resolve the user’s SCIM ID from IDENTITY_DOMAIN_USER_NAME, then grant the app role required by the toolset. Use MCP_Operator for SQL execution or MCP_User for metadata-only access.
export IDENTITY_DOMAIN_URL="$(
  oci iam domain get \
    --domain-id "$IDENTITY_DOMAIN_OCID" \
    --query 'data.url' \
    --raw-output
)"

export DBTOOLS_MCP_SCOPE="urn:opc:dbtools:mcpserver:${DBTOOLS_MCP_SERVER_OCID}mcp:all"
export MCP_APP_ROLE_NAME="MCP_Operator"

export IDENTITY_DOMAIN_USER_SCIM_ID="$(
  oci identity-domains \
    --endpoint "$IDENTITY_DOMAIN_URL" \
    users list \
    --filter "userName eq \"$IDENTITY_DOMAIN_USER_NAME\"" \
    --all \
    --attributes 'id,userName,displayName' \
    --query 'data.resources[0].id' \
    --raw-output
)"

oci identity-domains \
  --endpoint "$IDENTITY_DOMAIN_URL" \
  app-roles list \
  --all \
  --attributes 'id,displayName,description,app' \
  --output json > /tmp/deepsec-mcp-app-roles.json

export MCP_APP_ROLE_ID="$(
  jq -r --arg app "$DBTOOLS_MCP_DOMAIN_APP_ID" --arg role "$MCP_APP_ROLE_NAME" '
    .data.resources[]
    | select((.app.value // .app.id // "") == $app)
    | select((.["display-name"] // .displayName) == $role)
    | .id
  ' /tmp/deepsec-mcp-app-roles.json | head -n 1
)"
Grant the role to the existing user:
cat > /tmp/deepsec-mcp-role-grant.json <<JSON
{
  "schemas": ["urn:ietf:params:scim:schemas:oracle:idcs:Grant"],
  "grantMechanism": "ADMINISTRATOR_TO_USER",
  "grantee": { "type": "User", "value": "${IDENTITY_DOMAIN_USER_SCIM_ID}" },
  "app": { "value": "${DBTOOLS_MCP_DOMAIN_APP_ID}" },
  "entitlement": {
    "attributeName": "appRoles",
    "attributeValue": "${MCP_APP_ROLE_ID}"
  }
}
JSON

oci identity-domains \
  --endpoint "$IDENTITY_DOMAIN_URL" \
  grant create \
  --from-json file:///tmp/deepsec-mcp-role-grant.json
Step 8: Create The IAM Policy
Create the policy after the MCP Server and toolset. The DB connect-on-behalf-of statement needs DBTOOLS_MCP_SERVER_OCID. The group is referenced in fully qualified form; this does not create it or change membership.
cat > /tmp/deepsec-mcp-policy-statements.json <<EOF
[
  "allow any-user to use database-tools-db-connect-obo in tenancy where request.principal.id = '${DBTOOLS_MCP_SERVER_OCID}'",
  "allow group '${IDENTITY_DOMAIN_DISPLAY_NAME}'/'${MCP_USERS_GROUP_NAME}' to use database-tools-mcp-servers-invocation in compartment id ${COMPARTMENT_OCID}",
  "allow group '${IDENTITY_DOMAIN_DISPLAY_NAME}'/'${MCP_USERS_GROUP_NAME}' to use database-connections in compartment id ${COMPARTMENT_OCID}",
  "allow group '${IDENTITY_DOMAIN_DISPLAY_NAME}'/'${MCP_USERS_GROUP_NAME}' to use database-tools-connections in compartment id ${COMPARTMENT_OCID}",
  "allow group '${IDENTITY_DOMAIN_DISPLAY_NAME}'/'${MCP_USERS_GROUP_NAME}' to read secret-bundles in compartment id ${COMPARTMENT_OCID}"
]
EOF

oci iam policy create \
  --compartment-id "$TENANCY_OCID" \
  --name "$IAM_POLICY_NAME" \
  --description "Allow the existing identity-domain group to use the Deep Data Security MCP Server" \
  --statements file:///tmp/deepsec-mcp-policy-statements.json \
  --wait-for-state ACTIVE
Step 9: Validate With Codex And mcp-remote
Create or reuse a public OAuth client in the existing identity domain and attach it to this MCP Server. For local Codex validation, do not configure a client secret. Register this loopback redirect URI; its port must match the mcp-remote configuration:
http://localhost:9876/oauth/callbackexport DBTOOLS_MCP_CLIENT_ID="<public-oauth-client-id>"Add this entry to ~/.codex/config.toml, replacing the placeholders with the exported values.
[mcp_servers.deepsec-dbtools-mcp]
enabled = true
command = "npx"
startup_timeout_sec = 60
type = "stdio"
args = [
  "-y",
  "mcp-remote",
  "<DBTOOLS_MCP_ENDPOINT>",
  "9876",
  "--transport",
  "http-only",
  "--static-oauth-client-metadata",
  "{ \"scope\": \"<DBTOOLS_MCP_SCOPE> offline_access\" }",
  "--static-oauth-client-info",
  "{ \"client_id\": \"<DBTOOLS_MCP_CLIENT_ID>\" }"
]
Restart Codex. On first use, mcp-remote opens the OAuth flow. Sign in as the existing identity-domain user, then ask Codex to list the tools on deepsec-dbtools-mcp and run:
Use the deepsec-dbtools-mcp sql_run tool to run:
select ora_end_user_context.username as username from dual
Confirm the returned username is the existing identity-domain user. Then run:
Use the deepsec-dbtools-mcp sql_run tool to run:
select application_id, assigned_officer, in_underwriting_queue, status
from lending.loan_applications
fetch first 5 rows only
Verify that the returned username matches IDENTITY_DOMAIN_USER_NAME. The query returns only data granted to mcp_administrator_role: an application assigned to that user and applications in the underwriting queue; other applications are filtered out. If authorization fails, verify the public client’s redirect URI and scope, the user’s app role and group membership, and the IAM policy.
References
- What Is Oracle Deep Data Security
- Oracle Deep Data Security -Integrate with Database Tools MCP Server
- LiveLabs FastLab: Getting Started with Oracle Deep Data Security
- Create Data Role
- Create Data Grants
- Configure Data Access Control
- Database Tools Overview
- Database Tools MCP Server Overview
- Codex MCP configuration
- Integrating IAM Authentication with Database Tools Connections
- Create a Private Managed Database Tools MCP Server in OCI